
Contents
- 1 Introduction
- 2 Log in to Iptor WM1
- 3 Open an application window
- 4 Customize the grid view
- 5 Select multiple rows of data in the grid view
- 6 Work with grid view data
- 7 Customize the toolbar
- 8 Log out of the Iptor WM1 desktop client
- 9 Change your password
Introduction
The Iptor WM1 desktop client, which can be installed on or accessed from multiple desktops, provides the user interface that lets users perform warehousing tasks directly from their workstation. The client communicates with the centralized Iptor WM1 database server to supply and request information.
This guide explains how to log in to the Iptor WM1 desktop client, navigate through the application windows, and customize the windows to effectively support your work processes.
Prerequisites
This document is written with the assumption that you have previous experience working in a Microsoft® Windows® desktop application. In addition, to complete the step-by-step procedures in this document, you must have:
- Access to a Iptor WM1 desktop client that is configured to connect to a Iptor WM1 database server.
- Your login credentials, which define the functions that you can perform and the data that you can access. Your login credentials include:
- Site/Warehouse ID (if your Iptor WM1 environment is configured to support multiple sites/warehouses)
- User name
- Password
Log in to Iptor WM1
- Take one of the following actions.
- Log on to the desktop on which the Iptor WM1 desktop client software is installed.
- On the desktop, double-click the desktop client shortcut icon (
 ).
). - From the Start menu, display the list of programs, expand <Your Iptor WM1 Folder Name>, and then click Iptor WM1.
- On the desktop, double-click the desktop client shortcut icon (
- On the Iptor WM1 login window, take the following actions.
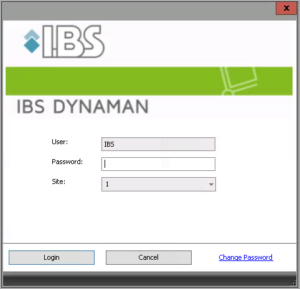
- In the User box, type your user name.
- In the Password box, type your password.
- If applicable, from the Site or Warehouse list, click the identifier for the site or warehouse to which you want to log in.
Note If your Iptor WM1 installation is not configured to support multiple sites/warehouses, the Site ID or the Warehouse ID fields may not appear. - Click Login. The Iptor WM1 desktop client window opens. From here, you can open one or more application windows.

Open an application window
Iptor WM1 application windows let you perform different tasks. For example, to manage inbound processing, a receiving clerk in the warehouse may work with Inbound Order Maintenance, Arrival Maintenance and Arrival Detail Maintenance. Whatever your responsibilities in the warehouse may be, you can open all of the application windows that you need to work with, and then keep them open all day for easy access.
If you do not specifically close windows before you log out of Iptor WM1 at the end of your work day, then when you log in the next day, Iptor WM1 will remember which windows you had open and automatically display them.
In this procedure you will learn how to open an application window using the Menu and the Search Menu tool.
- On the menu, click a category to expand it. A list of sub categories appears.

- Click a sub category to expand it. A list of applications appears.

- Double-click an application. The application window appears.
Open an application window using the Search Menu tool
- On the Iptor WM1 desktop client window, in the upper left corner, click
 . The Options tool dialog box appears.

- In the Search Menu box, type all or part of the name for the application window that you want to open.
Note For example, if you want to open the Inbound Order Maintenance window, you can type ord, order, inbound or order maintenance.
- Press Enter. The first application that contains your search criteria is highlighted in the menu.
- Take one of these actions.
If the highlighted application is… Then… The one that you want to open, Double-click the application name. Not the one that you want to open, Press Enter until the application that you want to open is highlighted, and then double-click the application name. Customize the grid view
You can customize the way data appears in the grid views to make your working environment more effective for you. You can take the following actions.
- Change the columns that appear
- Change the order in which the columns appear
- Fix columns and rows
- Sort data based on a column header
- Apply conditional formatting to a column
- Filter data
- Group data
- Calculate measurable data
Change the columns that appear
You can customize the columns that appear in the grid view to ensure that the information you need to work with is easily visible. Use this procedure to add or remove columns.
- At the top left corner of the grid view, click
 . The Field Chooser list appears. The fields associated with the columns that currently appear on the grid view are selected.

- Clear the check boxes for the columns that you do not want to appear in the grid view. The columns are removed from the grid view.
- If they are not selected already, select the check boxes for the columns that you want to appear in the grid view. The columns appear in the grid view.
- Close the Field Chooser list.
Change the order in which the columns appear
You can reposition the columns within the grid view to ensure that the data you need to see is visible and reduce or eliminate the need to scroll.
- In the grid view, drag a column heading to the position in which you want the column to appear.
- Continue until the columns appear in the desired order.
Fix columns and rows
In grid views that contain many columns and rows of information that you want viewable, you can fix columns and rows to keep an area of the grid view visible while you scroll to another area.
Fix a column
- In the toolbar, click
 . A push pin icon appears in all of the column headers.

- In the column header for the column that you want to fix, click
 . The push pin changes to the down position, and the column is fixed at the left side of the grid view. You can now scroll to the right, and the fixed column will remain visible.

- If you also want to fix the last column in the grid view, so you can scroll through the columns with both the first and last column visible, click
 .
.
Fix a row
- In the toolbar, click
 . A push pin icon appears at the left of each row.

- At the left side of the row that you want to fix, click . The push pin changes to the down position, and the row is fixed at the top of the grid view. You can now scroll down, and the fixed row will remain visible.

Clear a fixed column or row
- In the column header or at the left of the row, click
 .
.
Sort data based on a column header
You can sort the grid view data in ascending or descending order.
- In the grid view, click a column heading to sort the grid view data based on that column’s data.
- Click the column header again to toggle between ascending and descending order.
Note An up or down arrow in the column header indicates the column by which the data in the grid view is sorted.

Apply conditional formatting to a column
Conditional formatting is a method of formatting the data in a column based on criteria that you define. With conditional formatting, you can place emphasis on specific data by applying different background and foreground colors, and changing font types and sizes. Conditional formatting is helpful because it provides visual cues that direct users to important information.
Condition types
You can apply one or more of the following condition types.
- Operator – Allows you to define a conditional statement that evaluates two values based on an operator that you select, and then applies conditional formatting based on the results of the evaluation. For example, you can format all inbound orders in the entered status in blue.
- Condition group – Allows you to define multiple conditions that will be applied to a column of data. When creating a condition group, you can use one or more condition types.
- Formula – Allows you to define a formula.
- True – Sets the condition to true.
Procedure
In this procedure you will use the operator condition type to place conditional formatting on inbound orders based on their status.
Prerequisite
To complete this procedure, you must have inbound orders, in multiple statuses, available in inbound order maintenance.
- In the grid view, select a row in the column to which you want to apply conditional formatting. For this exercise, select a row in the Inbound Order Status column.
- In the toolbar, click
 . The Add Condition/Appearance Mappings dialog box appears.

- From the Select a condition type list, select Operator.

- From the Operator list, if it is not selected already, select = Equals.
- In the Text box, type 0 Entered for the first inbound order status.
- From the text formatting list, select the text formatting that you want to apply to all inbound orders in the Entered status, and then click OK. The formatting that you specified is applied to all inbound orders in the Entered status.

- With a row in the Inbound order status column still select, in the toolbar, click again.
- Click Add Condition, and then from the Select a condition type list, select Operator again.
- From the Operator list, if it is not selected already, select = Equals.
- In the Text box, type 30 Receivable for the next inbound order status.
- From the text formatting list, select the text formatting that you want to apply to all inbound orders in the Receivable status, and then click OK. The formatting that you specified is applied to all inbound orders in the Receivable status.
- Repeat this procedure until you have conditionalized all inbound order status values.
- If you want to remove conditionalized formatting, take the following actions.
- Select a row in the column where the conditional formatting is applied, and then click .

- At the end of the condition row, click
 , and then click OK.
- Select a row in the column where the conditional formatting is applied, and then click
Filter data
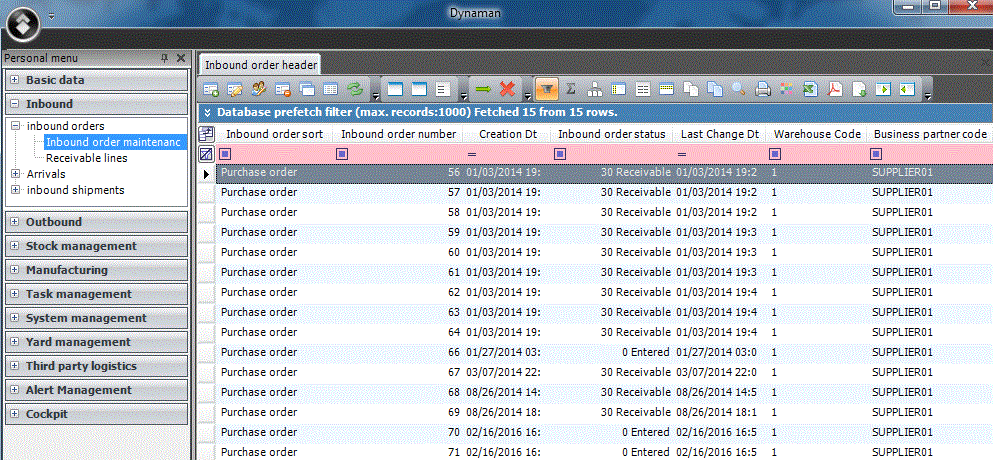
You can provide filter criteria to limit the data that appears in a grid view. Iptor WM1 includes two filter types.
- Prefetch filters – Filters that are predefined to display only a portion of the data available within an application. Prefetch filters are available in applications, such as Inbound and Outbound Order Maintenance, that contain a lot of data, and their purpose is to reduce response time when opening an application. After you open an application, you can change the predefined filter criteria to meet your needs.
- Grid filters – Filters that let you specify criteria to reduce the amount of data that appears in the grid view. You can provide filter criteria for one or more of the columns that appear in the grid view. Grid filters are available on all application windows.
Note When both filters are available on an application window, you can use the grid filter to further limit the data that the prefetch filter retrieved.
Filter components
The prefetch and grid view filters have the same filtering components. The only difference is that the prefetch filter has default filter criteria applied to reduce the amount of data that appears in the grid view initially. This image illustrates the components on the prefetch filter.

Add or change filter criteria
- Open an application window that includes a prefetch filter.
Note Prefetch filters appear in applications, such as Inbound Order Maintenance, Outbound Order Maintenance and Stock Detail, that contain a lot of data. - Take any one of these actions to add or modify filter criteria in the prefetch or grid view filters.
If you want to… Then… Hide or display the prefetch filter, In the upper left corner, click  to toggle between hidden and displayed.
Change the maximum number of lines to display, With the prefetch filter displayed, in the Max. records box, type or select the maximum number of lines that you want to appear in the grid view.
Note If you do not see the information that you need, and you have applied the correct search criteria, it may be because the maximum number of records to display is too low. Increase the number and then press Enter. Review the grid view again to find the information that you need. Display the grid view filter, In the Toolbar, click  .
.Clear filter criteria from all fields, On the far left side of the filter, click  .
. Clear filter criteria from a specific field, On the right side of the field, click . Apply a filter qualifier or operator,
Note Filter qualifiers help you narrow the data that appears when you do not know the specific criteria to enter. On the left side of the field, click
 .
. Note If a qualifier or an operator is already applied to a field, then the icon will display the qualifier or operator that is currently applied. Add or modify the data in a filter field, Take these actions.
- If there is data in the field, clear the field.
- Enter the filter criteria that you want to use.
- Press Enter.
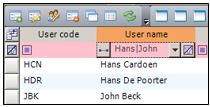
Search for multiple values in a single field, Take these actions.
- Click to display the grid view filter.
- In the column on which you want to filter, click the Filter Qualifiers icon, and then click Matches Regular Expression..
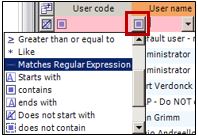
- Type in the values for which you want to search. Separate each value with a | vertical line/pipe. For example to find users with the first names of Hans and John, type Hans|John. The search results appear in the grid.
Group data
Use this procedure to organize the data in the grid view into expandable groups. This function eliminates the need for you to navigate through many rows of data to find the information that you need.
Note The images in the procedure below illustrate the result of grouping data in the Stock Detail application to make it easier for you to find the location(s) and container(s) in which items exist. - In the toolbar, click
 . A message appears telling you to drag a column into the group-by area.

- Drag a column header into the group-by area. The data is grouped into expandable rows.

- If you want to nest content under another group, drag another column header into the group-by area. The data is nested under the previous group.

- If you want to return to the original display, drag the column header(s) from the group-by area back into the grid view column header area.
Calculate measurable data
Use this procedure to apply a calculation action to the columns in a grid view that contain measurable data.
When you click the Calculation button in the toolbar, the calculation icon appears next to the column headers that contain measurable data. When you click the icon in the column header, a selection menu appears, and you can choose the calculation action, which is the way in which you want Iptor WM1 to summarize the data in the column. For example, if you want to quickly see how much inventory you have in the warehouse, you can apply the Sum calculation action to the Inventory Qty column in the Stock Detail grid view. After you select the calculation action and click OK, the calculated value appears at the bottom of the column.
Example
This image illustrates the results of applying the Sum calculation action to the Inventory Qty column in the Stock Detail grid view.

Procedure
- Open an application window that contains measurable data in the grid view columns.
- In the toolbar, click
 . The calculation icon appears in the column headers for those columns that contain measurable data.
 - In the column to which you want to apply a calculation action, click . A list of calculation summary options appears.
- Select the check box for the calculation action that you want to perform, and then click OK. The calculation appears at the bottom of the column.
Select multiple rows of data in the grid view
When working in Iptor WM1, you may want to work with more than one row of data. For example, if you want to release multiple purchase orders (POs) for receiving, you can save time by selecting all of the POs, and then using the right-click menu to release all of the POs at the same time.
There are two ways to select multiple lines. You can either select a consecutive group of lines or select a number of non-consecutive lines.
- Open a Iptor WM1 application window.
- If necessary, modify the filter criteria to ensure that multiple lines of data appear in the grid view.
- If you want to select a consecutive group of lines, select the check box at the left of the first line that you want to select, press and hold down the Shift key, and then select the check box next to the last line that you want to select.
- If you want to select non-consecutive lines, press and hold down the Ctrl key, and then select the check box at the left of each line that you want to select.
Work with grid view data
The following are the two ways in which you can work with the data in the grid view.
- Right-click a row in the grid view, and then select an action from the menu that appears.
- Select a row in the grid view, and then click a button in the toolbar.
For every right-click action that you can perform, there is an associated button in the toolbar. The actions that you can perform, along with the buttons that you see, are dependent upon your user permissions.
The table below provides a list of the standard buttons that appear in the Iptor WM1 toolbar and a description of what each button lets you do. Because your user permissions determine what you can do in Iptor WM1, you may not see all of the toolbar buttons that are described below.
This toobar button… Lets you… 
Add data to the active application. 
Edit a selected row of data. 
Edit multiple rows of selected data. 
Delete a selected row of data. 
Copy a selected row of data.
Note You can use the copy feature to save time when adding data to an active application. For example, if you want to create a purchase order manually, you can copy a similar purchase order, and then edit the copy to meet your needs. 
View more information about a selected row of data. 
Refresh the data in the grid view. 
Display the grid view filter. For more information, see Filter data. 
Calculate column totals. For more information, see Calculate measurable data. Group grid view data by a column header(s). For more information, see Group data. Pin a fixed column at the left of the grid view. For more information, see Fix columns and rows. Pin a fixed column at the right of the grid view. For more information, see Fix columns and rows. Pin a fixed row at the top of the grid view. For more information, see Fix columns and rows. 
Copy selected rows to the Clipboard. 
Copy selected rows, along with their header information, to the Clipboard. 
View how the data in the grid view will print prior to printing. 
Print the data that appears in the grid view. Apply conditional formatting to a column. 
Export the data in the grid view into a Microsoft® Excel® spreadsheet.
Note You must have Excel installed on your workstation, or on the server that is hosting the Iptor WM1 desktop client. 
Export the data in the grid view into an Adobe® Acrobat® .pdf file. 
Import data from a Microsoft Excel spreadsheet. 
Expand all rows. 
Collapse all rows. In addition to the standard buttons, toolbars include application-specific buttons. For example, there may be buttons to perform an action related to the application data, such as releasing or closing an inbound order. To learn what action each button performs, you can place the mouse over a button and a description will appear.
The application-specific buttons are also dependent upon your user permissions.
Customize the toolbar
For each application window, if your user permissions allow, you can change the buttons that appear in the toolbar to meet your needs.
- In the toolbar, click
 , then hover over Add or Remove Buttons > Function Basics. A list of the standard functions related to the active application appears.
Note The shortcut function keys associated with the functions also appear.

- To remove a button, clear the selected check box.
- To add a button, select the cleared check box.
- When you have customized the buttons that appear for basic application functions, then you can repeat this procedure to customize the buttons for the following toolbar options.
- Grids – These are the additional grid views associated with the active application.
- Actions – These are the the application-specific functions.
- Grid Features – These are the standard functions for manipulating the data in the grid view.
Return to the standard toolbar
- If you want to return to the standard toolbar, click , hover over Add or Remove Buttons > Function Basics, and then click Reset Toolbar.
Log out of the Iptor WM1 desktop client
To keep the information in Iptor WM1 secure, it is important that you log out, or exit Iptor WM1, when you are done working.
- In the upper left corner of the application window, click . The Option menu appears.
- Take one of these actions.
If you want to… Then click… Log out, Log Off. When you log out, Iptor WM1 closes, and the Iptor WM1 login window appears. This lets you quickly log in again later, or lets another user log in using their login credentials.
Exit, Quit.
When you choose this option, Iptor WM1 closes, and the Iptor WM1 login window does not appear.
Change your password
Your login credentials are used to secure the information in Iptor WM1. If you think that somebody else knows your password, it is critical to Iptor WM1 security that you change the password.
IMPORTANT You may need permission from a system administrator before changing a password. Do not proceed with this procedure until you have contacted your system administrator. - If you are currently logged in to the Iptor WM1 desktop client, then log out.
- If you are not logged in to the Iptor WM1 desktop client, then log in.
- On the Iptor WM1 login window, in the User box, type your user name.
- Click Change Password. The Change Password dialog box appears.
- Enter the following information.
Field Description Old password Password that you want to change. Password New password that you want to use. Retype password Same password that you entered into the Password box. This ensures that you typed your new password correctly. If you mistype the first or second entry, a message appears indicating that the passwords do not match. - When you are sure that the new passwords match, click OK. Your password is changed, and the Iptor WM1 login window appears again.
- Log in with your new password.

