
Contents
Introduction
A container is an object that holds inventory for storage and transport. In Iptor WM1, all inventory is located in a container. A container is defined by its unique container code, and has a size, type and level type. This guide explains how to identify and provide specific details about containers.
Prerequisites
When configuring container parameters, you are asked to provide the following prerequisite data.
- Location sizes
- Owners
- Label prefix
If you have not done so, perform the setup tasks for required data first. Then, return to complete the container setup.
- Owner information can include identification of several owner-level default settings, including containers. If your configuration requires assigning a default container to owners, then after completing the container setup procedures, return to the procedure for adding owners in System setup and add the container detail.
Basic data
In this guide you will learn how to set up the following data.
- Container sizes
- Container size and location size relationships
- Parent-child container size hierarchies
- Container types
- Container type relationships
- Owner and container type relationships
- Container level types
- Container level type relations
- Containers
- Container comments
- Damage information
- Storage containers
Container sizes
Container size is a mandatory parameter, as it is linked to location size to form the basis of managing available space.
Container size is also used to set up macro locations, and in the package calculation, where the system defines what container sizes are possible for use as a ‘to container’ for piece picking.
Add a container size
- On the menu, expand Basic Data > Logistic Units > Container Parameter, and then double-click Container Size.
- On the Container Size window, in the toolbar, click
 . The Add Container Size dialog box appears.
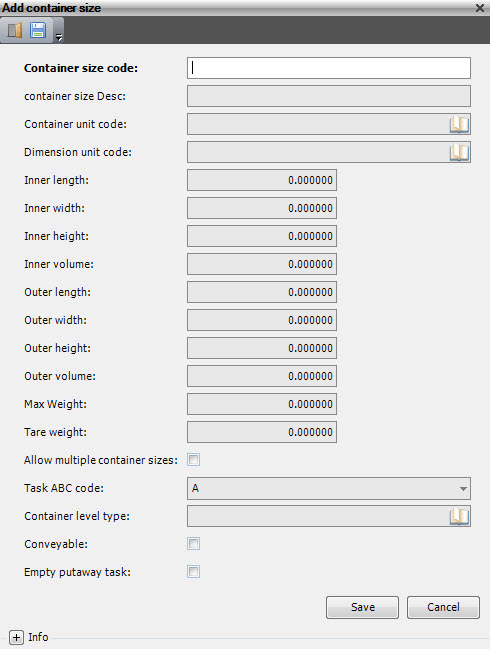
- Enter the following information.
| Field | Description | Required |
| Container Size Code | Unique system code that identifies a container size. | Yes |
| Container Size Desc | Simple statement that defines the container size code. For example, if the container size code is 45, the description may be 45 foot high container. | Yes |
| Container Unit Code | Allowable unit of measurement (for example, each, SKU or box) for a container of the specified container size. Informational only. | No |
| Dimension Unit Code | Unit of measurement (for example, meter, foot or inch) that is used for the dimensions of the specified container size. Informational only. | No |
| Inner Length | Length of the inside of a container of the specified container size. Informational only. | No |
| Inner Width | Width of the inside of a container of the specified container size. Informational only. | No |
| Inner Height | Height of the inside of a container of the specified container size. Informational only. | No |
| Inner Volume | Volume of the inside of a container of the specified container size. Informational only. | No |
| Outer Length | Length of the outside of a container of the specified container size. Informational only. | No |
| Outer Width | Width of the outside of a container of the specified container size. Informational only. | No |
| Outer Height | Height of the outside of a container of the specified container size. Informational only. | No |
| Outer Volume | Volume of the outside of a container of the specified container size. Informational only. | No |
| Max Weight | Maximum weight allowed for all inventory placed in a container of the specified container size. Informational only. | Yes |
| Tare Weight | Weight of a container of the specified container size when it is empty. Informational only. | Yes |
| Allow Multiple Container Sizes | When selected, indicates that a container from another level of the parent-child container hierarchy is allowed with a container of this container size. Currently not used. | Yes |
| Task ABC Code | Unique system code used to group container sizes. Currently not used. | Yes |
| Container Level Type | Level of this container when a multi-level (parent-child) container hierarchy is used. Currently not used. | Yes |
| Conveyable | When selected, indicates that a container of the specified container size can be placed on a conveyor. | Yes |
| Empty Putaway Task | When selected, indicates that an empty putaway task can be generated for a container of the specified container size. | Yes |
- Click Save.
Container size and location size relationships
A container with inventory is always located in a location, therefore you must define the relationships between container sizes and location sizes.
Iptor WM1 calculates location occupancy based on the container size and location size. If there are multiple container sizes at the location, calculation is done using the first container size. For example, in the location size PALLET, you can put a maximum of two container sizes HALF and one container size PALL.
Putaway logic uses the container and location size relation as one of the basic restrictions.
For example, a warehouse has container sizes E120, E160 and E180, where the number indicates the height of the container. The warehouse then has location sizes E130, E160 and E240, where the number indicates the height of the location. You use the container and location size link to set up where the containers are allowed to be stored. For this example, you could only allow container size E180 in location size E240. But you could specify that container size E120 is allowed on location size E130 and location size E160. You would likely choose not to allow container size E120 on location size E240 though. While it would fit, that would not be a good utilization of space.
Add a container size and location size relationship
- On the menu, expand Basic Data > Logistic Units > Container Parameter, and then double-click Container Size.
- On the Container Size window, right-click the container for which you want to define location relationships, and then click Container and Location Size.
- In the Container and Location Size grid view toolbar, click . The Add Container and Location Size dialog box appears.
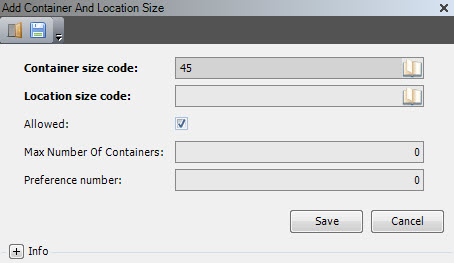
- Enter the following information.
| Field | Description | Required |
| Container Size Code | Unique system code that identifies a container size. | Display only |
| Location Size Code | Unique system code that identifies a location size. | Yes |
| Allowed | When selected, indicates that a container of the specified container size can be stored in a location of the specified location size. | No |
| Max Number of Containers | Maximum number of containers of the specified container size that can be stored in a location of the specified location size. | No |
| Preference Number | Priority setting used by some putaway algorithms. The smaller the number, the higher the priority given to the container size/location size combination. | No |
- Click Save.
Parent-child container size hierarchies
This setup task defines the relationship between container sizes if a parent-child container hierarchy is used.
Add a parent-child container size hierarchy
- On the menu, expand Basic Data > Logistic Units > Container Parameter, and then double-click Container Size.
- On the Container Size window, right-click the container size for which you want to define a parent relation, and then click Container Size Relation.
- In the Container Size Relation grid view toolbar, click . The Add Container Size Relation dialog box appears.
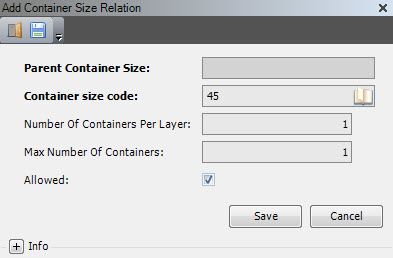
- Enter the following information.
| Field | Description | Required |
| Parent Container Size | Unique system code that identifies a container size. A container of the specified container size is the parent container in the parent-child hierarchy. | Yes |
| Container Size Code | Unique system code that identifies a container size. | No |
| Number of Containers per Layer | Number of containers of the specified child container size that can be placed in a single layer within a container of the parent container size. | Yes |
| Max Number of Containers | Total number of containers of the child container size that are allowed within a container of the parent container size. | No |
| Allowed | When selected, indicates that the specified parent-child container hierarchy is allowed. | No |
- Click Save.
Container types
The container type determines the following important aspects of a container.
- Container usage
- Whether the container becomes inactive when empty
- Whether alias container codes are generated
- The way container code is generated (SSCC, sequential number, etc.)
- If the container can be used as returnable packaging
Container usage
There are many possible types of containers, which include the following usages.
- Real containers – Inventory holders that are used to move the inventory in the warehouse, such as pallets and totes. These containers are typically transportable (Container Usage=RT), but a non-transportable option (Container Usage=RN) can be selected.
- Fictitious containers – Inventory holders that are used to store pieces or single boxes, such as drawers, shelves, carousel locations and pick-to-light locations. If there is only one fictitious container on the location, normally the container code is the location code. Fictitious containers are typically non-transportable (Container Usage=FN), but a transportable option (Container Usage=FT) can be selected. To move inventory automatically to a fictitious container, locations holding fictitious containers must have a location exception configured.
- Equipment containers – Inventory holders that are placed on equipment locations, such as conveyors and trolleys. (Container Usage=EQ) When moving pieces from a receiving container to a storage container, equipment containers are typically used.
- Vehicle containers – Inventory holders that are used to transport product. More specifically, these are the trailers that are identified in yard management when unloading and loading product. (Container Usage=VH)
Add a container type
- On the menu, expand Basic Data > Logistic Units > Container Parameter, and then double-click Container Type.
- On the Container Type window, in the toolbar, click . The Add Container Type dialog box appears.
- Enter the following information.
| Field | Description | Required |
| Container Type Code | Unique system code that identifies a container type. | Yes |
| Container Type Desc | Simple statement that defines the container type code. For example, if the container type code is D45, the description may be Dry 45 foot. | Yes |
| Classification Cat 1–6 | Classification category that can be used for reporting purposes. The value description can be stored in the code checking table. | No |
| Alias Generator | Code used to specify how to generate an alias for the Container Code. For example, an alias generator of @@@@@@@@&&-@@@@&&&& creates an alias for the SSCC code 354110680900000101 of 09-0101. | No |
| Dimension Unit Code | Unit of measurement (for example, meter, foot or inch) that is used for the dimensions of the specified container type. Informational only. | No |
| Length | Length of a container of the specified container type. Informational only. | No |
| Width | Width of a container of the specified container type. Informational only. | No |
| Height | Height of a container of the specified container type. Informational only. | No |
| Tare Weight | Weight of a container of the specified container type when it is empty. Informational only. | No |
| Standard Unit Value | Additional dimension field that can be used for reporting purposes. | No |
| Last Count Dt | Date and time for the last count performed on a container of the specified container type. | No |
| Returnable Packaging | When selected, indicates that a container of the specified container type can be used as returnable packaging. When cleared, indicates that the container cannot be used as returnable packaging. |
No |
| Packaging Option | Packaging method to use for a container of the specified container type. The following values are supported.
|
Yes |
| Inactivate When Empty | When selected, indicates that when a container of this container type becomes empty, the Container Code is removed from the location and system. When cleared, indicates that the container is to remain in the location and system when empty. Typically, the checkbox is cleared for equipment and non-transportable containers. | No |
| Container Usage | Defined use for a container of the specified container type. The following values are supported.
|
Yes |
| EAN Packaging Indicator | Initial character to be used when creating the SSCC Code. Typically, this is set to 3 (Not defined). The following values are supported.
|
No |
| Label Prefix | First character to be used after the EAN Packaging Indicator and the EAN Company Code when creating the SSCC Code. Additional settings for the Container Code generation are defined in the label generator table. | No |
| If (Interface) Processing | When selected, indicates that the empty container information for a container of the specified container type is sent in a transaction to the host system. This is an additional condition to the normal interface setup. | No |
| Track Temperature | When selected, indicates that the temperature of a container of the specified container type is being tracked. This flag can be used for containers of usage VH – Vehicle. | No |
| Track Fuel Level | When selected, indicates that the fuel level of a container of the specified container type is being tracked. This flag can be used for containers of usage VH – Vehicle. | No |
| Logistic Group Code | Group identifier used during Value Added Logistics actions. | No |
| Prepare Duration | Number of minutes required to prepare a container of the specified container type. This flag can be used for containers of usage VH – Vehicle. | No |
| Yard Background Color | Color used in visualization to indicate a container of the specified container type. | No |
- Click the Audit Flags tab.
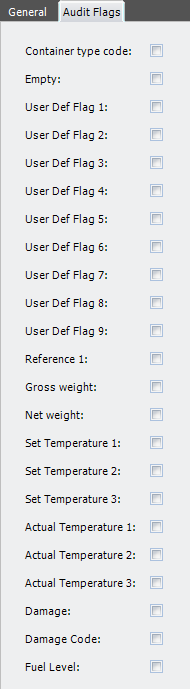
- Enter the following information.
| Field | Description | Required |
| Container Type Code | When selected, indicates that Container Type Code information is displayed during audits. | No |
| Empty | When selected, indicates that Empty information is displayed during audits. | No |
| User Def Flag 1–9 | When selected, indicates that user defined information is displayed during audits. | No |
| Reference 1 | When selected, indicates that reference information is displayed during audits. | No |
| Gross Weight | When selected, indicates that Gross Weight information is displayed during audits. | No |
| Net Weight | When selected, indicates that Net Weight information is displayed during audits. | No |
| Set Temperature 1 | When selected, indicates that Set Front Temperature information is displayed during audits. This flag can be used for containers of usage VH – Vehicle. | No |
| Set Temperature 2 | When selected, indicates that Set Middle Temperature information is displayed during audits. This flag can be used for containers of usage VH – Vehicle. | No |
| Set Temperature 3 | When selected, indicates that Set Rear Temperature information is displayed during audits. This flag can be used for containers of usage VH – Vehicle. | No |
| Actual Temperature 1 | When selected, indicates that Actual Front Temperature information is displayed during audits. This flag can be used for containers of usage VH – Vehicle. | No |
| Actual Temperature 2 | When selected, indicates that Actual Middle Temperature information is displayed during audits. This flag can be used for containers of usage VH – Vehicle. | No |
| Actual Temperature 3 | When selected, indicates that Actual Rear Temperature information is displayed during audits. This flag can be used for containers of usage VH – Vehicle. | No |
| Damage | When selected, indicates that Damage information is displayed during audits. | No |
| Damage Code | When selected, indicates that Damage Code information is displayed during audits. | No |
| Fuel Level | When selected, indicates that Fuel Level information is displayed during audits. This flag can be used for containers of usage VH – Vehicle. | No |
- Click Save.
Container type relationships
This setup task defines the number of containers of a specified container type that can fit inside of another container type.
Add a container type relationship
- On the menu, expand Basic Data > Logistic Units > Container Parameter, and then double-click Container Type.
- On the Container Type window, right-click the container type for which you want to add a relation, and then click Container Type Relation.
- In the Container Type Relation grid view toolbar, click . The Add Container Type Relation dialog box appears.

- Enter the following information.
| Field | Description | Required |
| Main Container Type Code | Unique system code that identifies a container type. In this usage, it defaults to the selected container type. | Display only |
| Container Type Code | Unique system code that identifies a container type. In this usage, it is the code for the type of container you want to associate with the main container type code. | No |
| Number of Containers | Number of containers of the specified container type code that fit inside of a container of the specified main container type code | No |
- Click Save.
Owner and container type relationships
This setup task defines the container types that are allowed for an owner.
You can also define how container numbers are generated for each owner and how they are validated. Normally container codes belong to one owner and cannot be scanned for inventory of another owner.
For more information, see the section below on Container code formats.
Add an owner and container type relationship
- On the menu, expand Basic Data > Logistic Units > Container Parameter, and then double-click Container Type.
- On the Container Type window, right-click the container type for which you want to define owner information, and then click Owner and Container Type.
- In the Owner and Container Type grid view toolbar, click . The Add Owner and Container Type dialog box appears.
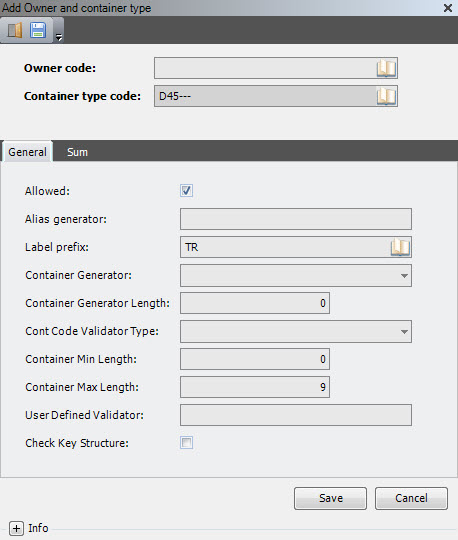
- Enter the following information.
| Field | Description | Required |
| Owner Code | Unique system code that identifies an owner. | Yes |
| Container Type Code | Unique system code that identifies a container type. In this usage, defaults to the container type code of the container type for which you are defining owner relations. | Display only |
| Allowed | When selected, indicates that a container of the specified container type is allowed for the specified owner. When cleared, or if no record is found for a given combination, indicates that the container type is not allowed for the owner. | No |
| Alias Generator | Code used to specify how to generate an alias for the Container Code. For example, an alias generator of @@@@@@@@&&-@@@@&&&& creates an alias for the SSCC code 354110680900000101 of 09-0101. | No |
| Label Prefix | First character to be used after the EAN Packaging Indicator and the EAN Company Code when creating the SSCC Code. Additional settings for the Container Code generation are defined in the label generator table. | No |
| Container Generator | Method used to generate container codes. The following values are supported.
|
No |
| Container Generator Length | Length of the generated container code when the SEQNR (Sequential number) generation method is used. For SSCC, this must be 18. | No |
| Cont Code Validator Type | Validation method used for container codes. The following values are supported.
|
Yes |
| Container Min Length | Minimum length allowed for a non-existing container code when the LENGT (Length) validation method is used. For SSCC, this must be 18. | No |
| Container Max Length | Maximum length allowed for a non-existing container code when the LENGT (Length) validation method is used. For SSCC, this must be 18. | No |
| User Defined Validator | Name of a customizable stored procedure that is used to validate the code of a non-existing container when the CUST (Customer specific) validation method is used. | No |
| Check Key Structure | When selected, indicates that the container code is checked against the table to ensure usage of valid container key structures. | No |
- Click the Sum tab.
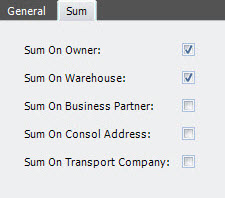
- Enter the following information.
| Field | Description | Required |
| Sum on Owner | When selected, indicates that the container count transactions for the specified owner and container type should be summarized on owner. | No |
| Sum on Warehouse | When selected, indicates that the container count transactions for the specified owner and container type should be summarized on warehouse. | No |
| Sum on Business Partner | When selected, indicates that the container count transactions for the specified owner and container type should be summarized on business partner. | No |
| Sum on Consol Address | When selected, indicates that the container count transactions for the specified owner and container type should be summarized on consolidation address. | No |
| Sum on Transport Company | When selected, indicates that the container count transactions for the specified owner and container type should be summarized on transport company. | No |
- Click Save.
Container level types
Container level types are used to classify containers in relation to a multi-level structure. Iptor WM1 requires that at least one container level type be defined. However, a container can have multiple levels within a parent-child hierarchy. Using multi-level containers provides the following features.
- Multi-level containers have tree-like structure.
- One parent can have multiple children.
- A child has only one parent.
- A parent is always a child of itself.
- Multi-level nesting depends on container level type and item level type.
- Not all items allow multi-level management.
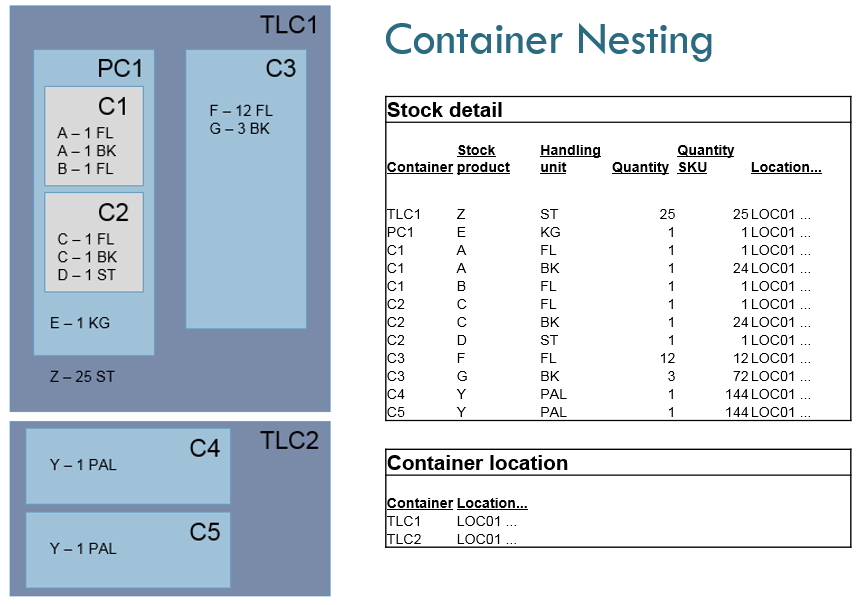
When dealing with multi-level containers, the top level container is the container that can be on a location. The child containers in this container are stock level containers.
A container is a top level container as long as it is (directly) on a location. A container is a stock level container if it is in / on another container. Since nesting is possible, the system identifies for a stock level container the level of nesting and the relation between stock level container(s) up to the top level container. This is done internally in the container explosion table.

Container level type can also be related to item level type.
To use multi-level containers, define the master container level type (parent) first, and then define the additional container level types and relations.
| IMPORTANT | Using multi-level containers is a complex process that generates a lot of transactions, thereby impacting performance heavily. Use this approach only when absolutely necessary. |
Add a container level type
- On the menu, expand Basic Data > Logistic Units > Container Parameter, and then double-click Container Level Type.
- On the Container Level Type window, in the toolbar, click . The Add Container Level Type dialog box appears.
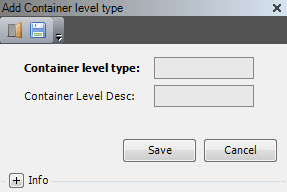
- Enter the following information.
| Field | Description | Required |
| Container Level Type | Unique system code that identifies a container level. | Yes |
| Container Level Desc | Simple statement that defines the container level type. For example, if the container size code is CHILD, the description may be Child container. | Yes |
- Click Save.
Container level type relations
Defining a container level type relation is optional. It allows you to define how containers with container level types can be combined, in relation to the item level types of the stock products in the child container.
Add a container level type relation
- On the menu, expand Basic Data > Logistic Units > Container Parameter, and then double-click Container Level Type.
- On the Container Level Type window, right-click the container level type for which you want to define a relation, and then click Container Level Type Relation.
- In the Container Level Type Relation grid view toolbar, click . The Add Container Level Type Relation dialog box appears.
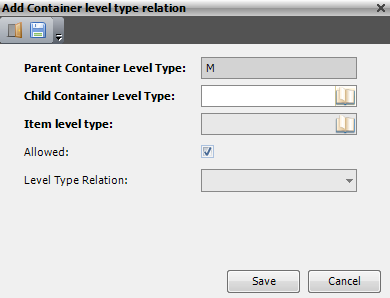
- Enter the following information.
| Field | Description | Required |
| Parent Container Level Type | Value that identifies the container level type of the container in which you put the child container. | Display only |
| Child Container Level Type | Value that identifies the container level type of the container that you put in the parent container. | Yes |
| Item Level Type | Value that identifies the item level type of the stock products in the child container than will be put in the parent container. | Yes |
| Allowed | When selected, indicates that the relation is allowed. | Yes |
| Level Type Relation |
Value that identifies the level type relation. The following values are supported.
|
Yes |
- Click Save.
Containers
A container is an object that holds inventory for storage and transport. In Iptor WM1, all inventory is located in a container. A container is defined by its unique container code, and has a size, type and level type.
Container code formats
Iptor WM1 supports several container code formats, which include the following.
- Sequential numbers
- Barcode (EAN-128) GS1-128
- SSCC (Serial Shipping Container Code)
The container code can:
- Come from any logistic system.
- Be entered manually.
- Be generated automatically by the system, which can be based on:
- A fixed part followed by a number range.
- SSCC as per ICODIF-standards, which has:
- An EAN packaging indicator (one digit N1, usually 3, as defined in the container type table)
- An EAN company (seven digits N2N3N4N5N6N7N8, as defined in the owner table or warehouse table)
- A label prefix (one digit N9, as defined in the container type table)
- A sequential number (eight digits N10N11N12N13N14N15N16N17, taken from the label generator table)
(There is a variant ‘SSCC Day of year, that uses a sequential number having N10 the last digit of the year, N11N12N13 the number of the day in the year and N14N15N16N17 a sequential number of 4 digits within that day.) - A check digit (N18), calculated so that 3 (N1+N3+N5+N7+N9+N11+N13+N15+N17) + (N2+N4+N6+N8+N10+N12+N14+N16+N18) is an entire multiple of ten.
- Be configured to check length based on owner parameters.
About SSCC
The following image is an example of an SSCC format container code.
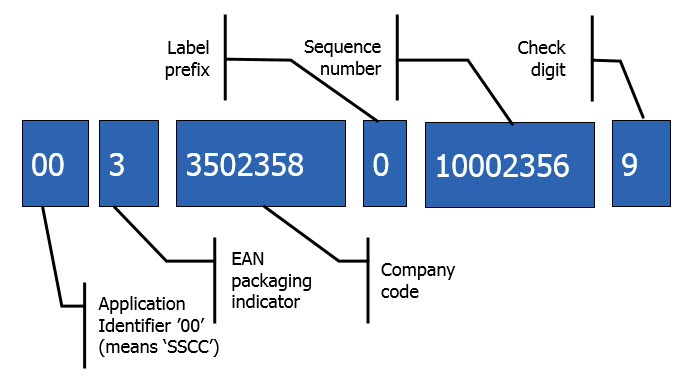
The SSCC container code has a length of 18 numbers, which are shown and/or can be entered in the windows of the Iptor WM1 desktop client.
On the (container) label however, the barcode content also includes the 2 leading zeroes of the ‘application identifier’. Typically, the HRI (Human Readable Info) that is printed with the barcode can or cannot include the leading zeroes, that can be included with brackets. For example: (00)335023582100023569.
When scanning the barcode in the Iptor WM1 CAP panel, the system automatically converts the content of 20 numbers with 2 leading zeroes to the container code with 18 numbers. The Iptor WM1 CAP panel also accepts a container code that is entered with only 18 numbers.
Prerequisites
When configuring the container, you are asked to provide the following prerequisite data.
- Container sizes
- Owners (optional)
- Container types
- Stacking classes (optional)
- Container levels
- Damage codes (optional)
If you have not done so, perform the setup tasks for required data first. Then, return to complete this procedure. For optional data, if you do not have it defined yet, you can return to this section later in the setup process to add that detail.
Add a container
- On the menu, expand Basic Data > Logistic Units > Container Setup, and then double-click Container.
- On the Container window, in the toolbar, click . The Add Container dialog box appears.

- Enter the following information.
| Field | Description | Required | ||||||
| Container Code | Unique system code that identifies a container. The container code can be taken from a logistic system (for example, incoming via an ASN – Advanced Shipping Note), and can be entered manually, or can be generated automatically by the system. The automatic label generation can be based on a fixed part followed by a number range, but Iptor WM1 also supports the creation SSCC as per GS1-standards. | Yes | ||||||
| Container Size Code | Unique system code that identifies a container size. | Yes | ||||||
| Container Code Alias | Alternative identifier for the container code, often used to keep a reference of the owner or an internal code. The alias can be created automatically when SSCC code is generated using the Alias generator field on the Add Container Type window. | No | ||||||
| Product Location Group Code | Unique system code that identifies a product location group. This field is filled automatically by the system when inventory is moved to a container. Inventory of different product location groups cannot be moved to the same container unless a container exception is created. | No | ||||||
| Cur Lifecycle | Number that indicates the amount of times the container has been activated. This field is filled automatically by the system. When a container is created, the current lifecycle is set to 1. Each time a container is re-activated the lifecycle is increased by 1. | No | ||||||
| Owner Code | Unique system code that identifies an owner. | No | ||||||
| Pincode | Pincode for a container. | No | ||||||
| Container Type Code | Unique system code that identifies a container type. The container type code is used to track returnable packaging, and to determine how the system generates and/or validates the container code. | Yes | ||||||
| Container Usage |
Defined use for a container of the specified container type. The following values are supported.
|
Yes | ||||||
| Stacking Class Code | Unique system code that identifies a stacking class. The stacking class is used to calculate how to stack containers. | No | ||||||
| Container Level Type | Unique system code that identifies a container level type. | No | ||||||
| Empty | When selected, indicates that the container is empty. This status is updated by Iptor WM1 when tasks are performed or when inventory is moved. | No | ||||||
| Task ABC Code |
Unique system code that provides a method for filtering tasks for containers. The following values are supported.
|
No | ||||||
| Full Container | When selected, indicates that the container is considered full (either based on the inventory quantity or by manual intervention). | No | ||||||
| Putaway Key Code Handling | Value that indicates if the putaway key code is updated manually or automatically.
|
No | ||||||
| Container Active | When selected, indicates that the container is active, meaning it is in use or available for use in Iptor WM1. | No | ||||||
| Putaway Key Code | Code used by some calculation methods during the calculation of a putaway location. It can also be used by customer specific applications in order to be able to fit special putaway methods into the standard calculation methods. | No | ||||||
| Set Temperature Section 1 | Expected temperature for front of the trailer. This flag can be used for containers of usage VH – Vehicle. |
No | ||||||
| Set Temperature Section 2 | Expected temperature for middle of the trailer. This flag can be used for containers of usage VH – Vehicle. |
No | ||||||
| Set Temperature Section 3 | Expected temperature for the rear of the trailer. This flag can be used for containers of usage VH – Vehicle. |
No | ||||||
| Actual Temperature Section 1 | Actual temperature for the front of the trailer. This flag can be used for containers of usage VH – Vehicle. |
No | ||||||
| Actual Temperature Section 2 | Actual temperature for the middle of the trailer. This flag can be used for containers of usage VH – Vehicle. |
No | ||||||
| Actual Temperature Section 3 | Actual temperature for the rear of the trailer. This flag can be used for containers of usage VH – Vehicle. |
No | ||||||
| Damage | When selected, indicates that the trailer is damaged. This flag can be used for containers of usage VH – Vehicle. |
No | ||||||
| Damage Code | Code used to determine if a trailer can be loaded for outbound. The damage can be described in (multiple lines of) damage information. This flag can be used for containers of usage VH – Vehicle. | No | ||||||
| Lost | When selected, indicates that the trailer is lost. This flag can be used for containers of usage VH – Vehicle. |
No | ||||||
| Container Wash | When selected, indicates that during trailer move, execute a VAL of trailer wash. This value is set during shipment appointment creation or during closing of a shipment. This flag can be used for containers of usage VH – Vehicle. |
No | ||||||
| Fuel Level | Actual fuel level of the trailer at check in. This flag can be used for containers of usage VH – Vehicle. |
No | ||||||
| Print Status |
Printing status of labels when new container codes are created. The following values are supported.
|
No |
- Click the Date/Time tab.
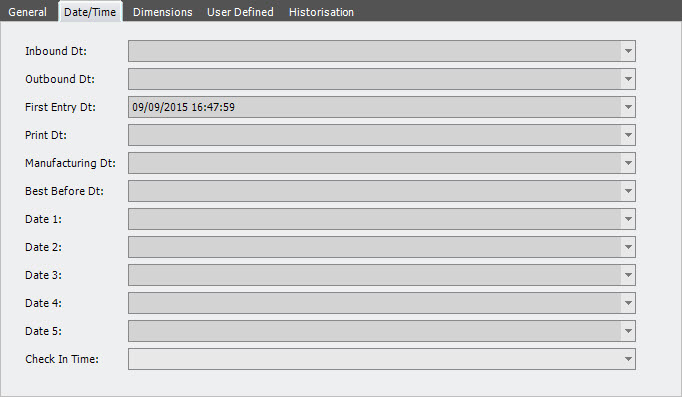
- View the following information.
| Field | Description | Required |
| Inbound Dt | Date and time that the first putaway task is performed. | Display only |
| Outbound Dt | Date and time that the shipping transaction is performed. | Display only |
| First Entry Dt | Date and time that the container was created or was entered into the system. | Display only |
| Print Dt | Date and time that the label printed. | Display only |
| Manufacturing Dt | Date and time that the inventory was manufactured. | Display only |
| Best Before Dt | Expiration date for the inventory. | Display only |
| Date 1–5 | Customizable date field. | Display only |
| Check In Time | Date and time that the trailer is checked in. Used to calculate the dwell time for the trailer. The date is reset when trailer checks out. | Display only |
- Click the Dimensions tab.
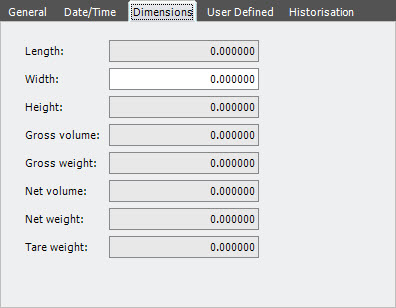
- Enter the following information.
| Field | Description | Required |
| Length | Actual length of a container (not necessarily the same as the inner or outer length of the container size). | No |
| Width | Actual width of a container (not necessarily the same as the inner or outer width of the container size). | No |
| Height | Actual height of a container (not necessarily the same as the inner or outer height of the container size). | No |
| Gross Volume | Actual gross volume of a container. | No |
| Gross Weight | Actual gross weight of a container. | No |
| Net Volume | Actual net volume of a container. | No |
| Net Weight | Actual net weight of a container. | No |
| Tare Weight | Weight of a container when it is empty. | No |
- Click the User Defined tab.
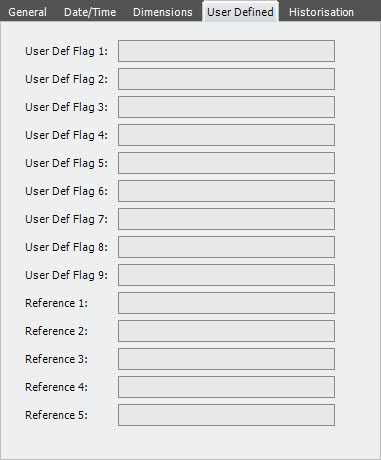
- Enter the following information.
| Field | Description | Required |
| User Def Flag 1–9 | Customizable user-defined data for the trailer. | No |
| Reference 1–5 | Customizable reference data for the trailer. | No |
- Click the Historisation tab.

- Enter the following information.
| Field | Description | Required |
| His Flag | When selected, a historical record is kept for the container. This is a system setting. | No |
- Click Save.
Container comments
This option can be used to add comments to containers with the container usage VH – Vehicle. Two types of comments are possible; a general comment and damage-related comment.
Add a container comment
- On the menu, expand Basic Data > Logistic Units > Container Setup, and then double-click Container.
- On the Container window, in the toolbar, right-click the container for which you want to add a comment, and then click Container Comment.
- In the Container Comment grid view toolbar, click . The Add Container Comment dialog box appears.
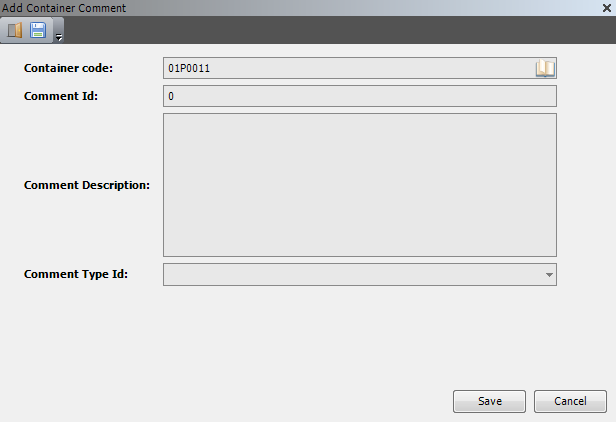
- Enter the following information.
Field Description Required Container Code Unique system code that identifies a container. The container code can be taken from a logistic system (for example, incoming via an ASN – Advanced Shipping Note), can be entered manually, or can be generated automatically by the system. In this usage, this can refer to a container with the container usage VH – Vehicle.
Yes Comment Id Sequence number, generated by the system. Yes Comment Description Comment text to add to the container. No Comment Type Id Value that defines the type of comment. The following values are supported.
- 30 – Container General
- 10 – Container Damage (This type can also be entered using the Container menu option, Damage information.)
Yes - Click Save.
Damage information
This option can be used to add comments regarding damage to containers with the container usage VH – Vehicle.
Add damage information
- On the menu, expand Basic Data > Logistic Units > Container Setup, and then double-click Container.
- On the Container window, in the toolbar, right-click the container for which you want to add damage information, and then click Damage Information.
- In the Damage Information grid view toolbar, click . The Add Damage Information dialog box appears.

- Enter the following information.
Field Description Required Container Code Unique system code that identifies a container. The container code can be taken from a logistic system (for example, incoming via an ASN – Advanced Shipping Note), can be entered manually, or can be generated automatically by the system. In this usage, this can refer to a container with the container usage VH – Vehicle. Yes Damage Code Unique system code that identifies damage.
In this usage, it used to define the damage that is linked to a container with container usage VH – Vehicle.Yes Damage Notes Comment text to add to the container. No - Click Save.
Storage containers
Storage containers are used in Yard management solely for storage; meaning those containers that do not have associated shipments.
The Storage Container menu option is only used for trailers that are used in Yard management. A ‘trailer’ in Iptor WM1 is a container that has a container usage, VH – Vehicle. Therefore, the Storage Container menu option should only be used for containers of usage, VH – Vehicle.
For example, you have wooden pallets and no room to store them in the warehouse. Rather than leaving them on the ground outside in the weather, you identify fleet in the yard as storage containers and put the empty pallets in them. You assign them with the commodity code, Wood. The storage containers are located in location(s) in the yard. When a user looks at a yard location containing a storage container, s/he will see the generic description of “wood”. When Yard management routines look for an empty container (= vehicle) to assign an outbound shipment, the system will skip the storage containers.
Prerequisites
When configuring the storage container, you are asked to provide the following prerequisite data.
- Container sizes
- Owners (optional)
- Container types
- Stacking classes (optional)
- Container levels
- Damage codes (optional)
- Commodities (optional)
If you have not done so, perform the setup tasks for required data first. Then, return to complete this procedure. For optional data, if you do not have it defined yet, you can return to this section later in the setup process to add that detail.
Add a storage container
- On the menu, expand Basic Data > Logistic Units > Container Setup, and then double-click Storage Containers.
- On the Storage Container window, in the toolbar, click . The Add Storage Container dialog box appears.
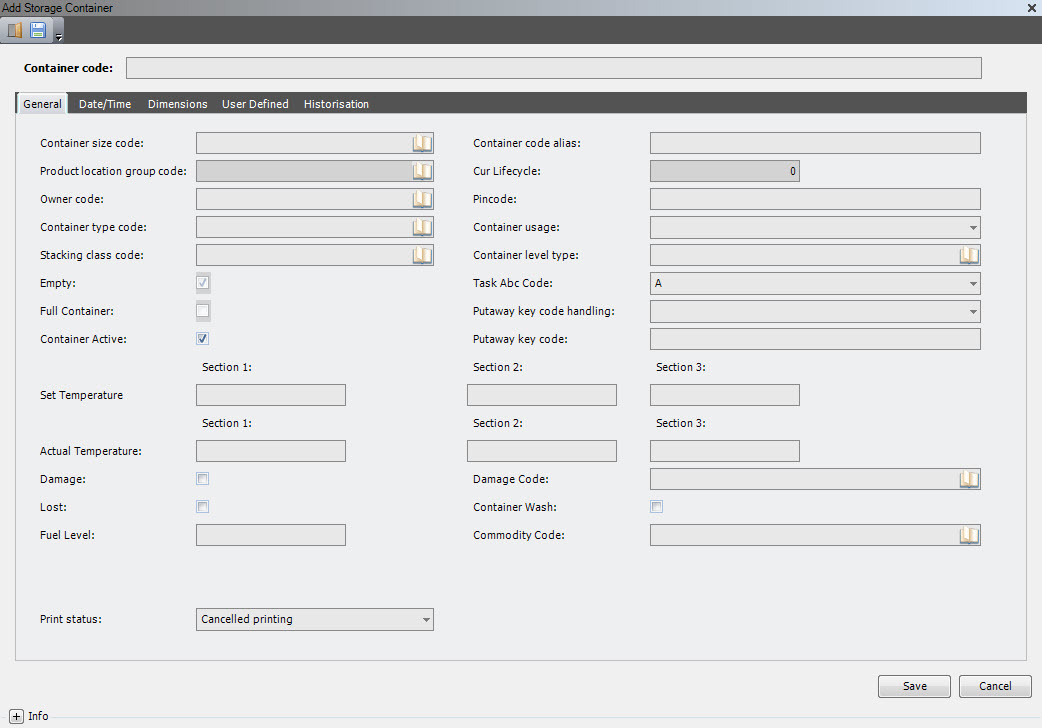
- Enter the following information.
| Field | Description | Required | ||||||
| Container Code | Unique system code that identifies a container. The container code can be taken from a logistic system, can be entered manually, or can be generated automatically by the system. The automatic label generation can be based on a fixed part followed by a number range, but Iptor WM1 also supports the creation SSCC as per ICODIF-standards. | Yes | ||||||
| Container Size Code | Unique system code that identifies a container size. | Yes | ||||||
| Container Code Alias | Alternative identifier for the container code, often used to keep a reference of the owner or an internal code. The alias can be created automatically when SSCC code is generated using the Alias generator field on the Add Container Type window. | No | ||||||
| Product Location Group Code | Unique system code that identifies a product location group. This field is filled automatically by the system when inventory is moved to a container. Inventory of different product location groups cannot be moved to the same container unless a container exception is created. | No | ||||||
| Cur Lifecycle | Number that indicates the amount of times the container has been activated. This field is filled automatically by the system. When a container is created, the current lifecycle is set to 1. Each time a container is re-activated the lifecycle is increased by 1. | No | ||||||
| Owner Code | Unique system code that identifies an owner. | No | ||||||
| Pincode | Pincode for a container. | No | ||||||
| Container Type Code | Unique system code that identifies a container type. This code is used to track returnable packaging. | Yes | ||||||
| Container Usage | Defined use for a container of the specified container type. For storage containers, only containers with usage VH – Vehicle should be used. | Yes | ||||||
| Stacking Class Code | Unique system code that identifies a stacking class. The stacking class is used to calculate how to stack containers. | No | ||||||
| Container Level Type | Unique system code that identifies a container level type. | No | ||||||
| Empty | When selected, indicates that the container is empty. This status is updated by Iptor WM1 when tasks are performed or when inventory is moved. | No | ||||||
| Task ABC Code |
Unique system code that provides a method for filtering tasks for containers. The following values are supported.
|
No | ||||||
| Full Container | When selected, indicates that the container is considered full (based on inventory quantity or by manual intervention). | No | ||||||
| Putaway Key Code Handling |
Value that indicates if putaway key code is updated manually or automatically.
|
No | ||||||
| Container Active | When selected, indicates that the container is active, meaning it is in use or available for use in Iptor WM1. | No | ||||||
| Putaway Key Code | Code used by some calculation methods during the calculation of a putaway location. It can also be used by customer specific applications to fit special putaway methods into the standard calculation methods. | No | ||||||
| Set Temperature Section 1 | Expected temperature for front of the trailer. | No | ||||||
| Set Temperature Section 2 | Expected temperature for middle of the trailer. | No | ||||||
| Set Temperature Section 3 | Expected temperature for the rear of the trailer. | No | ||||||
| Actual Temperature Section 1 | Actual temperature for the front of the trailer. | No | ||||||
| Actual Temperature Section 2 | Actual temperature for the middle of the trailer. | No | ||||||
| Actual Temperature Section 3 | Actual temperature for the rear of the trailer. | No | ||||||
| Damage | When selected, indicates that the trailer is damaged. | No | ||||||
| Damage Code | Code used to determine if a trailer can be loaded for outbound. | No | ||||||
| Lost | When selected, indicates that the trailer is lost. | No | ||||||
| Container Wash | When selected, indicates that during trailer move, execute a VAL of trailer wash. This value is set during shipment appointment creation or during closing of a shipment. | No | ||||||
|
Fuel Level |
Actual fuel level of the trailer at check in. | No | ||||||
| Commodity Code | Value that identifies the commodity that is being stored on the container (vehicle). | No | ||||||
| Print Status |
Printing status of labels when new container codes are created. The following values are supported.
|
No |
- Click the Date/Time tab.
- View the following information.
| Field | Description | Required |
| Inbound Dt | Date and time that the first putaway task is performed. | Display only |
| Outbound Dt | Date and time that the shipping transaction is performed. | Display only |
| First Entry Dt | Date and time that the container was created or was entered into the system. | Display only |
| Print Dt | Date and time that the label printed. | Display only |
| Manufacturing Dt | Date and time that the inventory was manufactured. | Display only |
| Best Before Dt | Expiration date for the inventory. | Display only |
| Date 1–5 | Customizable date field. | Display only |
| Check In Time | Date and time that the trailer is checked in. Used to calculate the dwell time for the trailer. The date is reset when trailer checks out. | Display only |
- Click the Dimensions tab.
- Enter the following information.
| Field | Description | Required |
| Length | Actual length of a container (not necessarily the same as the inner or outer length of the container size). | No |
| Width | Actual width of a container (not necessarily the same as the inner or outer width of the container size). | No |
| Height | Actual height of a container (not necessarily the same as the inner or outer height of the container size). | No |
| Gross Volume | Actual gross volume of a container. | No |
| Gross Weight | Actual gross weight of a container. | No |
| Net Volume | Actual net volume of a container. | No |
| Net Weight | Actual net weight of a container. | No |
| Tare Weight | Weight of a container when it is empty. | No |
- Click the User Defined tab.
- Enter the following information.
| Field | Description | Required |
| User Def Flag 1–9 | Customizable user-defined data for the trailer. | No |
| Reference 1–5 | Customizable reference data for the trailer. | No |
- Click the Historisation tab.
- Enter the following information.
| Field | Description | Required |
| His Flag | When selected, a historical record is kept for the container. This is a system setting. | No |
- Click Save.
