
Introduction
A user is a person who is authorized to access and use the Iptor WM1 desktop client or the Iptor WM1 Compact Application on a mobile device, such as an RF terminal. This guide explains how to add users to your environment and indicate the functionality that users are authorized to access.
Basic data
In this guide you will learn how to set up the following data.
- User types
- User type and reason code relationships (stock change security)
- User type and menu function link relationships
- Users
After users are defined, you must assign them to the warehouses and zones in which they are authorized to work. You perform those steps as part of warehouse setup.
User types
User types group users into specific categories (for example, an administrator, picking clerk, receiving clerk and supervisor). These groups are then used to establish authorization to various parts of the system, such as menus and zones.
Add a user type
- On the menu, expand Basic Data > System > User, and then double-click User Type.
- On the User Type window, in the toolbar, click
 . The Add User Type dialog box appears.

- Enter the following information.
| Field | Description | Required |
| User Type Code | Unique system code that identifies a user type. | Yes |
| User Type Desc | Simple statement that defines the user type. For example, if the user type is ADMIN, the description may be Administrator. | Yes |
| User Authority | Currently not used. Select Normal. | Yes |
| Default User Config Path | File system location, such as C:\Users, where user configuration data is stored for users. Within the specified folder, individual user folders are created to store user preferences, such as custom filters, grid view settings and open applications. The user configurations ensure that a user’s unique settings are applied each time the user logs in on that device. In addition, within the user’s configuration folder is a Iptor WM1_logged_in.txt file, which exists as long as a user is logged in. The file prevents multiple users from logging in on the device with the same user credentials. If you do not enter a specific path and folder name, the unique user folders are created in C:\ibs\dynamansettings. Specifies the default config path for users of this type. |
No |
| Max Number of Equipment | Number that identifies the maximum number of pieces of equipment that users assigned to this user type can work with simultaneously. | No |
- Click Save.
User type and reason code relationships (stock change security)
The reason code security feature lets you associate reason codes with specific user types in order to limit the use of reason codes to specific users in your warehouse. For example, you may only want floor supervisors to use a reason code that changes the inventory status of an item and, consequently, makes an item unpickable.
| Note | Reason codes are not available to users until you associate them with a user type. Therefore, you must associate a reason code with all user types that need to apply the code. |
Prerequisites
To complete this procedure, you must have already set up the following data.
- User types
- Reason codes
If you have not done so, perform the setup tasks for required data first. Then, return to complete this procedure.
Add a user type and reason code relationship
- On the menu, expand Basic Data > System > User, and then double-click User Type.
- On the User Type window, right-click the user type to which you want to add reason code security, and then click Stock Change Security.
- In the Stock Change Security grid view toolbar, click . The Add Stock Change Security dialog box appears.

- Enter the following information.
| Field | Description | Required |
| User Type Code | Unique system code that identifies a user type. In this usage, it defaults to the user type code that you selected. | Display only |
| Stock Change Code | Unique system code that can be used to indicate the reason why an inventory transaction or task execution is done. It can be authorized by user type and determines what kind of inventory transaction or task execution is allowed. It is also used to define if the inventory transaction or task execution is interfaced. In this usage, identifies the reason code that the users within the selected user type are able to use. | Yes |
| Allowed | When selected, indicates that the reason code security is active. When cleared, or if no record is found for a given combination, indicates that the reason code security is not allowed. | No |
- Click Save.
A security feature lets you associate reason codes with specific user types to limit the use of menu function links.
| Note | Menu function links are not available to users until you associate them with a user type. |
Prerequisites
To complete this procedure, you must have already set up the following data.
- User types
- Menu function links
If you have not done so, perform the setup tasks for required data first. Then, return to complete this procedure.
- On the menu, expand Basic Data > System > User, and then double-click User Type.
- On the User Type window, right-click the user type to which you want to add reason code security, and then click User Type Menu Function Link.
- In the User Type Menu Function Link grid view toolbar, click . The Add User Type Menu Function Link dialog box appears.
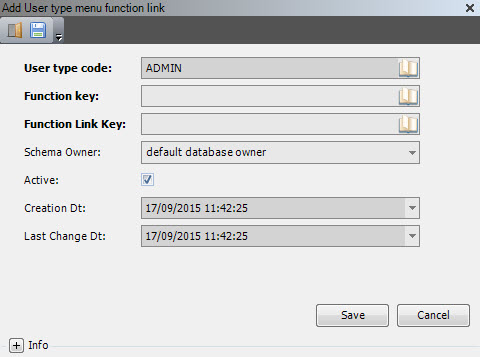
- Enter the following information.
| Field | Description | Required |
| User Type Code | Unique system code that identifies a user type. In this usage, it defaults to the user type code that you selected. | Display only |
| Function Key | First key identifier of a menu function link. A menu function link identifies every function that a user can execute in the desktop client on a grid. These functions are mainly executed by clicking a button in the menu bar of a grid or by right-clicking an option for a selected row(s) on a grid. | Yes |
| Function Link Key | Second key identifier of a menu function link. A menu function link identifies every function that a user can execute in the desktop client on a grid. These functions are mainly executed by clicking a button in the menu bar of a grid or by right-clicking an option for a selected row(s) on a grid. | Yes |
| Schema Owner | Refers to where the data record originates. Iptor WM1 comes standard with the schema owner dbo. To distinguish customer specific entries, a customer schema can be used. The value of the customer schema is defined in the database and configured within Iptor WM1. It corresponds to the schema used when accessing the SQL database. The following values are supported.
The standard naming convention for a customer specific value is a combined abbreviation of the customer name and install location. For example, CompanyABC installed in location CityXYZ could be comcit. |
Yes |
| Active | When selected, indicates that the entry is active. | Yes |
| Creation Dt | Date and time of creation. Defaults to the current date and time. | Display only |
| Last Change Dt | Date and time that an update was last saved. | Display only |
- Click Save.
Users
A user is a person who is authorized to access and use the Iptor WM1 desktop client or the Iptor WM1 Compact Application on a mobile device, such as an RF terminal.
Every user must be identified in Iptor WM1 with a user account and then assigned to specific privileges.
Prerequisites
To complete this procedure, you must have already set up the following data.
- User types
- Menus
- Menu items
- Warehouses (optional)
If you have not done so, perform the setup tasks for required data first. Then, return to complete this procedure. For optional data, if you do not have it defined yet, you can return to this section later in the setup process to add that detail.
Add a user
- On the menu, expand Basic Data > System > User, and then double-click User.
- On the User window, in the toolbar, click . The Add User dialog box appears.

- Enter the following information.
| Field | Description | Required |
| User Code | Unique system code that identifies a user. | Yes |
| User Name | Name that the user provides when logging in to Iptor WM1. | Yes |
- On the General tab, enter the following information.
| Field | Description | Required |
| User Password | Password that the user provides when logging in to Iptor WM1. | Yes |
| User Type Code | Unique system code that identifies a user type. In this usage, it is the user type to which the user is assigned. The user type provides the user with the authority to perform specific actions within Iptor WM1. | Yes |
| User Active | When selected, indicates that the user can log in to Iptor WM1. | Yes |
| Active Directory User | When selected, indicates that the user can log in to Iptor WM1 using their Windows® login, as defined in the Active Directory™. (The Windows domain name must be provided in the Domain field.) When cleared, indicates that Active Directory log in is not allowed, and the user must log in using the user name and password that is set up in Iptor WM1. | No |
| Domain | Name of the network of clients and servers that share the same Active Directory, to which the user belongs. Only required if the Active Directory User check box is selected. | No |
| User License | Product key that permits the user to use the software. An Iptor representative can deliver this key, according to the license agreement. As long as you do not exceed the license agreement limits (for example, 20 concurrent users), you can copy this value to another user. | No |
| Single Signon | When selected, indicates that the user can sign on to the Iptor WM1 domain using the same credentials established for another domain. | No |
| CAP Logoff Reason | When selected, indicates that when the user logs off of directed work within a Iptor WM1 CAP session, a logoff reason screen appears, requiring the user to enter the reason for logging off of directed work. | No |
- Click the User Settings tab.

- Enter the following information.
| Field | Description | Required | ||||||||||||
| First Name | First name of the user. | No | ||||||||||||
| Middle Name | Middle name of the user. | No | ||||||||||||
| Last Name | Last name of the user. | No | ||||||||||||
| Email Address | Email address to which correspondence can be sent to the user. | No | ||||||||||||
| Language Code | Unique system code that identifies a language. Iptor WM1 uses ISO standard codes by default. However, these values can be changed. For example, they can be mapped to the codes for any host system. If a language is not specified, then the company language code is used by default. | Yes | ||||||||||||
| Culture ID | Value that indicates the language that appears on the Iptor WM1 windows and CAP screens for this user. This is available for multi-language sites for which translations are available and implemented. The default is English. The default is en-US (English – United States). | No | ||||||||||||
| Menu Code | Unique system code that identifies a menu. In this usage, it is the menu that is assigned to this user. | Yes | ||||||||||||
| User Config Path | File system location, such as C:\Users, where user configuration data is stored for users. Within the specified folder, individual user folders are created to store user preferences, such as custom filters, grid view settings and open applications. The user configurations ensure that a user’s unique settings are applied each time the user logs in on that device. In addition, within the user’s configuration folder is a Iptor WM1_logged_in.txt file, which exists as long as a user is logged in. The file prevents multiple users from logging in on the device with the same user credentials. If you do not enter a specific path and folder name, the unique user folders are created in C:\ibs\dynamansettings. Specifying this value overrides the default config path from user type. |
No | ||||||||||||
| Default Warehouse Code | Unique system code that identifies a warehouse. In this usage, it is the warehouse in which the user most commonly works. If you specify a default warehouse code, then when working in Iptor WM1, the code is automatically used when the user does not enter a warehouse code on the login panel. | No | ||||||||||||
| Printing Processing Method | Value that determines whether the print spooler on the client will process print jobs itself or will pass them on to the server to do the work.
|
No | ||||||||||||
| Priority Override | Value that indicates if and how the user is able to override tasks based on task priority.
|
Yes |
- Click the Compact Appliation tab.

- Enter the following information.
| Field | Description | Required |
| Initial Function ID | Value that indicates which panel the user sees after logging in to Iptor WM1 CAP. It defaults to the standard login screen. For example, STD_PANEL_1010. | No |
| Login User | User’s user code. Entering the user code value enables automatic signon for this user. | No |
| CAP Log Error | When selected, indicates that an error log is saved for this user while logged in to Iptor WM1 CAP. The log can be searched to identify specific patterns or errors encountered by the user. | No |
| Autosave Panels On Exit | When selected, indicates that user preferences, such as custom filters and grid view settings, are saved for this user upon exit from Iptor WM1 CAP. It is recommended to select this option. | Yes |
- Click Save.
IMPORTANT For security reasons, after creating your own administrative users, remove the user ‘IBS’ or modify the password, as the user ‘IBS’ has full privileges.
