
Contents
- 1 Introduction
- 2 Replenishment orders and templates
- 2.1 Replenishment scenarios
- 2.2 Replenishment types
- 2.3 Prerequisite tasks
- 2.3.1 Add a business partner
- 2.3.2 Add replenishment zones
- 2.3.3 Associate item locations with a replenishment zone
- 2.3.4 Configure item pick locations
- 2.3.5 Configure product pick locations
- 2.3.6 Configure the outbound template
- 2.3.7 Configure the wave template
- 2.3.8 Configure the picklist template
- 2.3.9 Configure picking group and picking rules
- 2.3.10 Configure the picking rule set
- 2.3.11 Configure the picking rules
- 2.3.12 Add picking rule criteria
- 2.4 Configure replenishment
- 2.5 Other Considerations
Introduction
Replenishment is the process of moving inventory from storage locations to pick locations to ensure that inventory is available to meet order demand. Replenishments can be triggered automatically based on:
- Specified replenishment points.
- Minimum and maximum inventory levels.
- Sales or manufacturing order shortages.
This guide explains how to identify and provide specific details about replenishments and how to configure Iptor WM1 to ensure that the replenishment requirements in your facility are addressed.
Replenishment orders and templates
When Iptor WM1 triggers a replenishment for an item, a replenishment outbound order (RP) is created. Creating an RP order is managed through a replenishment template. The replenishment template defines the picking group, wave, picklist and outbound template to use for an RP order. After the picklist for RP orders is released, replenishment pick tasks are created.
Replenishment scenarios
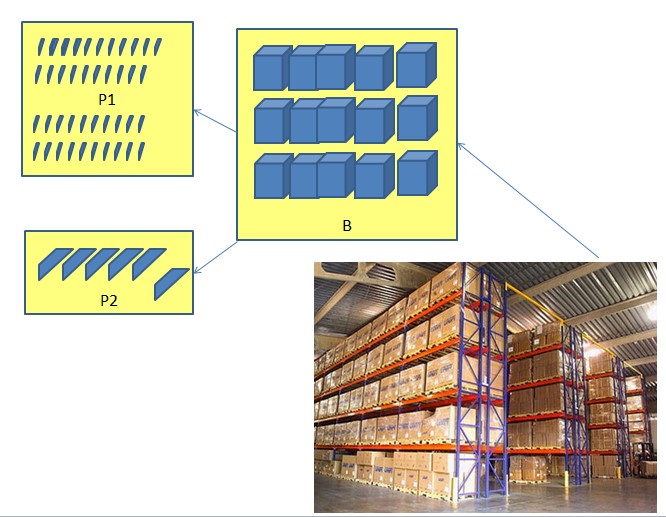
Prior to setting up replenishments, it is important that you understand and document your replenishment scenarios. Your replenishment setup will be based on the scenarios that you define. Below is an example of a simple replenishment scenario, and a brief description of the setup required to support the scenario.
| Scenario | Setup Overview |
Consider that the following four zones exist:
|
|
| Zones P1 and P2: Replenished from Zone B. | |
| Zone P1: Replenished every night to ensure that locations are full each morning. | |
| Zone B: Replenished from Zone S. | |
| Zone B: Configured to allow Iptor WM1 to search for a pick location. | |
| Replenishments are generated when there are shortages in Zones P1, P2 or B. |
The following image illustrates the four zones described in the scenario, and the zones from which the SKU pick locations are replenished.
Replenishment types
Iptor WM1 supports the following replenishment types:
- Picklist shortage replenishments – A replenishment can be requested automatically when picklists are generated and there is not enough inventory in the SKU pick locations to complete the pick tasks.
- Triggered replenishments – A triggered replenishment is a replenishment process that can be automatically generated at timed intervals or started manually by a user. The triggered replenishment process checks the items in locations configured for triggered replenishments. If the process finds quantities have dropped below the specified triggered or replenishment quantities, it issues a replenishment request.
- Manual replenishments – A manual replenishment is essentially an inventory move, which is manually initiated by a user or RF operator. It is typically generated when the user or RF operator determines that a location requires replenishment with a specific item.
You can configure replenishment to occur at any point during the day in which the inventory in a pick location falls below a specified replenishment point or low trigger quantity. You can also configure replenishment to occur specifically during low activity times based on a specified high trigger quantity. For example, if you associate an item pick location with low trigger quantity or replenishment point of 10, and a high trigger quantity of 100, then the following replenishments occur.
- During the day, as the inventory in the pick location drops below 10, the low quantity triggered replenishment process creates replenishments to fill it back up again.
- Towards the end of the day, as activity slows, the high triggered replenishment process is run. When inventory in the pick location drops below 100, replenishments are created to fill pick locations to their maximum capacity in preparation for the next day.
Prerequisite tasks
When you set up replenishments, you will configure a replenishment template to address each of your replenishment scenarios. Prior to configuring the replenishment templates, you must have already set up, or be familiar with, the following basic data.
- Business partner
- Replenishment zones
In addition to having business partners and replenishment zones set up, when you set up replenishments, you must also associate specific attributes to other previously defined basic data, and create templates and rules specific to replenishment. The following tasks are part of the replenishment setup process, and they must be completed prior to configuring the replenishment templates.
- Associate item locations with a replenishment zone
- Configure item pick locations
- Configure product pick location
- Configure an outbound template
- Configure a wave template
- Configure a picklist template
- Configure a picking group
- Configure a picking rule set
- Configure the picking rules
- Add the picking rule criteria
Add a business partner
When a replenishment is triggered, Iptor WM1 creates a replenishment outbound order (RP). Because all outbound orders require a business partner name, when you create the replenishment template, which manages the creation of the outbound order, you must provide a business partner name. The name that you provide must be defined in the Business Partner application; however, it can be a generic name, such as REPLEN. You can then use the name for all replenishment templates that you create. For instructions, see Add a business partner.
Add replenishment zones
All item locations that will be replenished must exist in a replenishment zone. If desired, you can configure replenishment differently for each replenishment zone. If you have not done so already, add the replenishment zones required to support your replenishment scenarios. For instructions see Add a replenishment zone.
Associate item locations with a replenishment zone
All locations to be replenished must be associated with a replenishment zone. You associate locations and replenishment zones by entering the replenishment zone code in the Replenishment Zone Code field in the Location application.
Prerequisites
Before you can associate item locations with replenishment zones, you must have defined the following basic data.
- Locations
- Replenishment zones
For more information about adding locations, see Add a location.
Procedure
- On the menu, expand Basic Data > Locations > Location Setup, and then double-click Location.
- On the Location window, click the location that you want to associate with a replenishment zone.
- In the toolbar, click
 . The Edit Location dialog box appears.
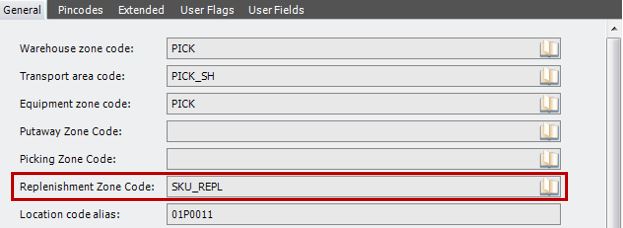
- In the Replenishment Zone Code field, select the replenishment zone that you want to associate with the location.
- Click Save.
Configure item pick locations
An item pick location must be configured for each item that will be replenished. When you configure an item pick location, you define the points at which replenishments for an item in that location will be generated.
Prerequisites
Before you can configure item pick locations, you must have defined the following basic data.
- Owner(s)
- Warehouse(s)
- Items
- Location types
- Locations
- Handling units
- Replenishment zones
- Putaway groups (if using dynamic pick locations during replenishment)
- Counting groups (if performing inline counting during replenishment)
Procedure
- On the menu, expand Basic Data > Stock Keeping Units > Product Setup, and then double-click Item Pick Location Management.
- On the Item Pick Location Management window, in the toolbar, click
 . The Add Item Pick Location Management dialog box appears.
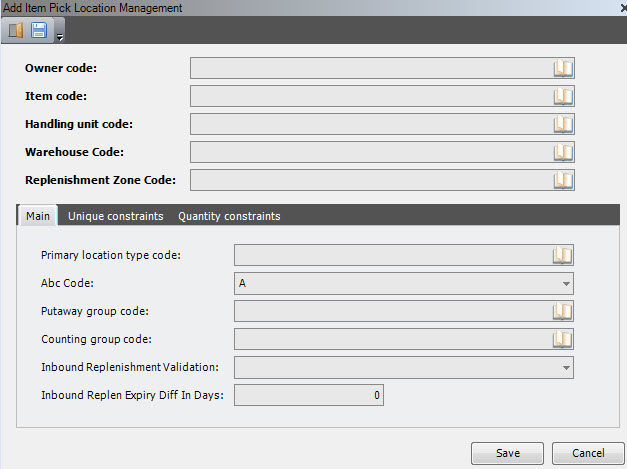
- Enter the following information.
| Field | Description | Required |
| Owner Code | Unique system code that identifies an owner. In this usage, it is the owner of the item for which you are configuring a pick location. | Yes |
| Item Code | Unique system code that identifies an item. In this usage, it is the item for which you are configuring a pick location. | Yes |
| Handling Unit Code | Unit of measure at which the item is managed and stored in the pick location. | Yes |
| Warehouse Code | Unique system code that identifies a warehouse. In this usage, it is the warehouse in which the item’s pick location exists. | Yes |
| Replenishment Zone Code | Unique system code that identifies a replenishment zone. In this usage, it is the replenishment zone in which the item’s pick location exists. | Yes |
- On the Main tab, enter the following information.
| Field | Description | Required |
| Primary Location Type Code | System code for the location type that identifies the primary use for the item’s pick location. Typically, when configuring replenishment, the primary location type is PICK. | Yes |
| ABC Code | Informational value associated with an item that can be used when creating rules and for reporting purposes. The value of this field is taken by default from the item table when creating a stock product. | No |
| Putaway Group Code | System code for the putaway group that will be used to determine dynamic pick locations for the item. This is the putaway group that contains the putaway rules for the item, which allow Iptor WM1 to effectively search for dynamic pick locations. | No |
| Counting Group Code | Unique system code that identifies a counting group. The counting group is used for inline counting and can be defined on item, item pick location management or on location. In this usage, it is the counting group with which the item is associated. The counting group is used only when inline counting is implemented. | No |
| Inbound Replenishment Validation |
Value that determines which additional checking is done during inbound replenishment; for example, which putaway calculation is performed. The following values are supported.
|
No |
| Inbound Replen Expiry Diff in Days |
Number of days for which the FEFO-principle may be bypassed. Required when the Inbound Replenishment Validation field value is FEFO. |
No |
- Click the Unique Constraints tab.
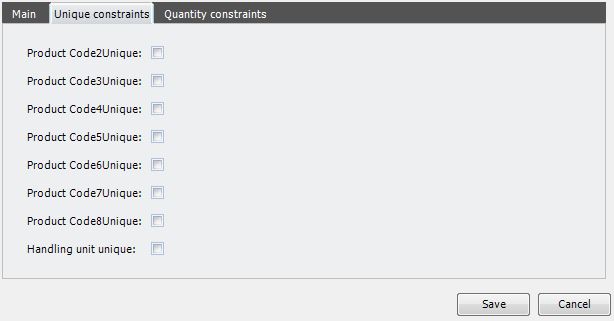
- Enter the following information.
| Field | Description | Required |
| Product Code 2–8 Unique | When selected, indicates that stock product associated with the product codes cannot be mixed in the item’s pick location. | No |
| Handling Unit Unique | When selected, indicates that multiple handling units of the item cannot be mixed in the item’s pick location. | No |
- Click the Quantity Constraints tab.
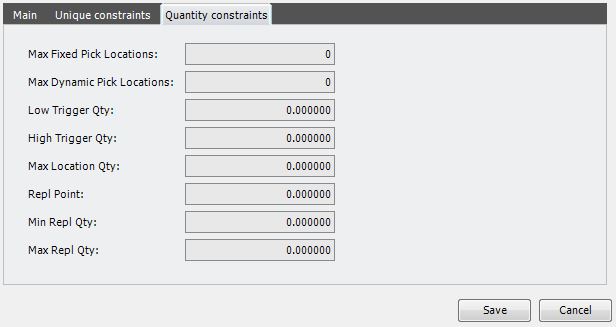
- Enter the following information.
IMPORTANT Values entered here will support your replenishment scenarios, and are used in the replenishment templates and rules that you create. For example, if you plan to create replenishment templates to manage both low and high trigger point replenishments, then you must provide both a low and a high trigger quantity.
| Field | Description | Required |
| Max Fixed Pick Locations | Maximum number of user-defined pick locations within the specified replenishment zone in which the item can be stored and replenished. | No |
| Max Dynamic Pick Locations | Maximum number of dynamic pick locations within the specified replenishment zone that Iptor WM1 can create to store and replenish the item. Iptor WM1 searches for dynamic pick locations based on the specified putaway group. | No |
| Low Trigger Qty | Value, always in stock keeping units, that defines the lowest level of inventory within a location that will trigger a replenishment for this item. For example, when the replenishment job runs, it will evaluate inventory levels, and when the evaluation determines that the quantity of this item is at or below this value, a replenishment order is created. The low trigger value can be used in a replenishment template that is configured to ensure that pick locations are replenished at any time during the day to ensure that inventory is available for order picking. | No |
| High Trigger Qty | Value, always in stock keeping units, that defines the highest level of inventory within a location that will trigger a replenishment for this item. For example, when the replenishment job runs, it will evaluate inventory levels, and when the evaluation determines that the quantity of this item is at or below this value, a replenishment order is created. The high trigger value can be used in a replenishment template that is configured especially to facilitate replenishments during a slower time in the warehouse, when a replenishment may not be essential, but will ensure filled locations for busier times. | No |
| Max Location Qty | Maximum number of items that can be replenished. | No |
| Repl Point | Value, always in stock keeping units, that defines the inventory level within a location that triggers a replenishment. For example, when the quantity of this item in a location falls below the specified point, Iptor WM1 will generate a replenishment order. | No |
| Min Repl Qty | Currently not used. | No |
| Max Repl Qty | Currently not used. | No |
- Click Save.
Configure product pick locations
All locations in a facility that are used for SKU picking and require replenishment must be configured as a product pick location. Product pick locations can be fixed or dynamic.
Procedure
- On the menu, expand Basic Data > Stock Keeping Units > Product Setup, and then double-click Product Pick Location.
- On the Product Pick Location window, in the toolbar, click . The Add Product Pick Location dialog box appears.
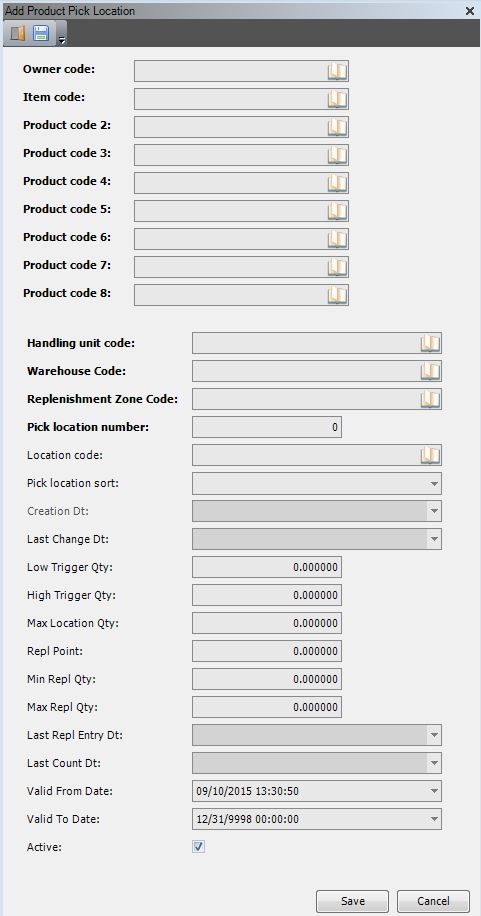
- Enter the following information.
| Field | Description | Required | ||||||
| Owner Code | Unique system code that identifies an owner. In this usage, it is the owner of the inventory that will be stored in the pick location. | Yes | ||||||
| Item Code | Unique system code that identifies an item. In this usage, it is the item that will be stored in the pick location. | Yes | ||||||
| Product Code 2–8 | Attributes, such lot number or serial number, that further define the item that will be stored in the location. Up to 7 product codes can be defined for an item using the product control types. | No | ||||||
| Handling Unit Code | Unit of measure at which the item stored in the location will be picked and replenished. This is the item’s stock keeping unit of measure. | Yes | ||||||
| Warehouse Code | Unique system code that identifies a warehouse. In this usage, it is the code for the warehouse in which the product pick location exists. | Yes | ||||||
| Replenishment Zone Code | Unique system code that identifies a replenishment zone. In this usage, it is the replenishment zone code in which the product pick location exists. | Yes | ||||||
| Pick Location Number | Display only. System-generated number for the product pick location. | Yes | ||||||
| Pick Location Sort | Value that determines how Iptor WM1 will select the location in which to store or replenish the item.
|
Yes | ||||||
| Creation Date | Display only. System-generated date. | Yes | ||||||
| Last Change Date | Display only. System-generated date. | Yes | ||||||
| Low Trigger Quantity | Low quantity replenishment trigger value. This value is populated from the item pick location configuration for the specified item. | No | ||||||
| High Trigger Quantity | High quantity replenishment trigger value. This value is populated from the item pick location configuration for the specified item. | No | ||||||
| Maximum Location Quantity | Maximum number of SKUs that can be stored in the location. This value is populated from the item pick location configuration for the specified item. | No | ||||||
| Replenishment Point | Value that defines the inventory level within a location that triggers a replenishment. This value is populated from the item pick location configuration for the specified item. | No | ||||||
| Minimum Replenishment Quantity | Minimum replenishment quantity. This value is populated from the item pick location configuration for the specified item. | No | ||||||
| Maximum Replenishment quantity | Maximum replenishment quantity. This value is populated from the item pick location configuration for the specified item. | No | ||||||
| Last Replenishment Entry Date | Date and time on which the inventory in the location was last replenished. Display only. System-generated date. | No | ||||||
| Last Count Date | Date and time on which the inventory in the location was last counted. Display only. System-generated date. | No | ||||||
| Valid From Date | Date on which the pick location became usable. When you configure a new pick location, the valid from date defaults to the current date.
|
No | ||||||
| Valid To Date | Date on which the pick location becomes unusable. When you configure a new pick location, the valid to date defaults to 12/31/9998. | No | ||||||
| Active | When selected, indicates that the pick location is usable. |
- Click Save.
Configure the outbound template
In general, the outbound template defines how picked containers must be handled. For example, the template indicates whether the picked containers should be:
- Shipped immediately after picking.
- Packed into shipping containers prior to shipping.
- Registered before loading because they are returnable containers.
Outbound template for replenishments
In the case of replenishments, the outbound template must indicate that the picked containers will not be shipped. Instead, the picked inventory will remain in the warehouse to fill a SKU pick location. Consequently, an outbound template specifically for replenishment orders must be created.
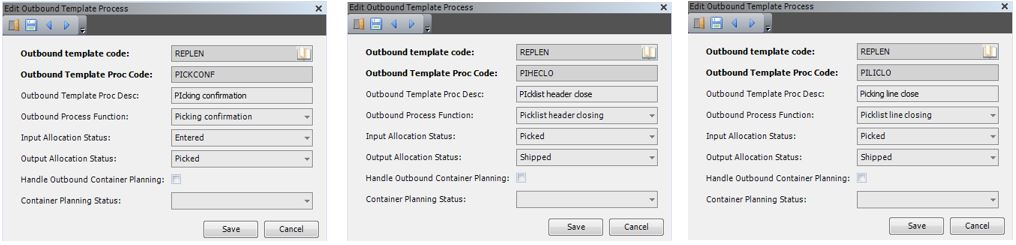
In addition to creating the outbound template, you must also configure the outbound template process. The outbound template process manages the replenishment order statuses once picking is started.
For example, when configuring a replenishment outbound template process, you can indicate that on picking confirmation the replenishment order status will change from 0 (Entered) to 40 (Picked). Once the picklist header or line is closed, you can configure the process to set the status to 90 (Finished) indicating that and no other processes are required.
Procedure
This procedure relates only to the information required to set up an outbound template for replenishment. For more information about outbound templates in general, see Outbound Processing Setup.
- On the menu, expand Basic Data > Advanced Functions > Outbound, and then double-click Outbound Template.
- On the Outbound Template window, in the toolbar, click . The Add Outbound Template window appears.
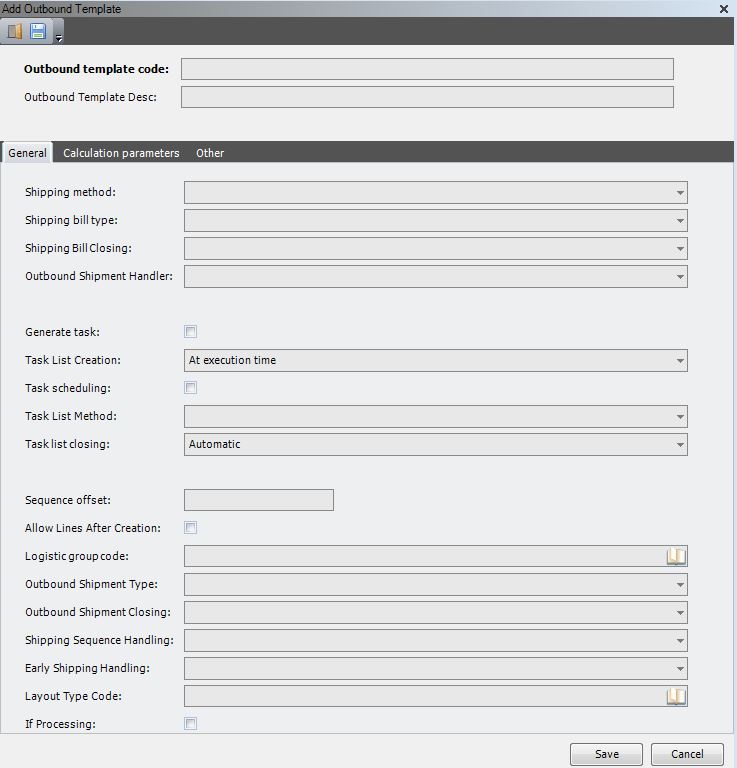
- Enter the following information.
| Field | Description | Required |
| Outbound Template Code | System code that Iptor WM1 will use when referring to the outbound template during processing. | Yes |
| Outbound Template Description | Simple statement that describes the outbound template code. | Yes |
| Outbound Shipment Handler | Value that indicates whether the picked inventory will be shipped or remain in the warehouse. For replenishments, select Pick Without Ship. | Yes |
- Refer to the image below for a typical example of how to configure an outbound template for replenishment.

- Click Save.
- On the Outbound Template window, right-click the outbound template that you created, and then click Outbound Template Process.
- In the Outbound Template Process grid view toolbar, click . The Add Outbound Template Process dialog box appears.

- Enter the following information.
| Field | Description | Required | ||||||||
| Outbound Template Code | System code for the outbound template. This value defaults to the outbound template that you just created or selected. | Yes | ||||||||
| Outbound Template Process Code | System code for the outbound template process that you want to define. This is the code that Iptor WM1 will use when performing outbound processing. | Yes | ||||||||
| Outbound Template Process Description | Simple statement that describes the intent of the outbound process. | Yes | ||||||||
| Outbound Process Function | Action associated with the function. To support replenishment, you must configure an outbound template process for the following functions.
|
Yes | ||||||||
| Input Allocation Status | Value that indicates the status to apply to a replenishment order after the associated function is confirmed. For a replenishment outbound template process, the following statuses are applied.
|
Yes | ||||||||
| Output Allocation Status | Value that indicates the status to apply to a replenishment order after the associated function is confirmed. For a replenishment outbound template process, the following statuses are applied.
|
Yes | ||||||||
| Handle Outbound Container Planning | Not required for a replenishment outbound template process. | No | ||||||||
| Container Planning Status | Not required for a replenishment outbound template process. | No |
- Click Save.
- Continue until you have configured the three required outbound template processes for replenishment.
| Note | Images below illustrate the configuration of the three required outbound template processes for replenishment. |
Configure the wave template
Wave templates make it easier to track and trace replenishments; therefore, it is a good idea to create a wave template specific to replenishments.
Prerequisite
This procedure relates specifically to configuring a wave template for replenishment, and it assumes that you are familiar with configuring wave templates in general. To learn about setting up wave templates, see Wave template setup.
Procedure
- On the menu, expand Basic Data > Advanced Functions > Outbound, and then double-click Wave Template.
- On the Outbound Template window, in the toolbar, click . The Add Wave Template dialog box appears.
- Refer to the image below for a typical example of how to configure a wave template for replenishment.
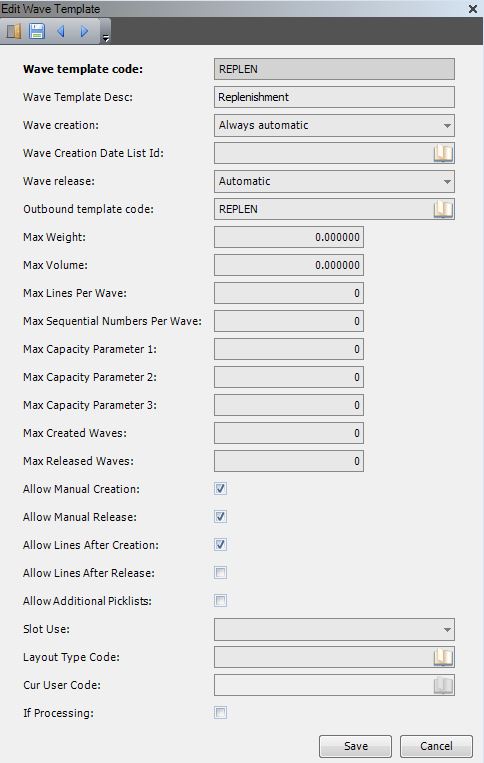
| Note | It is suggested that you use a consistent system code for all of the templates that you create to support replenishment. For example, if the outbound order template code is REPLEN, then the wave template code should also be REPLEN. |
- Click Save.
Configure the picklist template
The picklist template defines how outbound order details are grouped in a picklist and how the generated pick tasks are grouped. All outbound orders must have a picklist template, and because picking for replenishment orders is different than picking for standard outbound orders, it is suggested that you create a picklist template specific to replenishment. For example, with a replenishment picklist template, you can specify a docking area and location zone that are not part of the ship dock area. In addition, through scheduling, you can configure more automation.
Prerequisites
This procedure relates specifically to configuring a picklist template for replenishment, and it assumes that you are familiar with configuring picklist templates in general. To learn about setting up picklist templates, see Picklist template setup.
Procedure
- On the menu, expand Basic Data > Advanced Functions > Outbound, and then double-click Picklist Template.
- On the Picklist Template window, in the toolbar, click . The Add Picklist Template window appears.
- Refer to the image below for a typical example of how to configure the General settings for a replenishment picklist template.
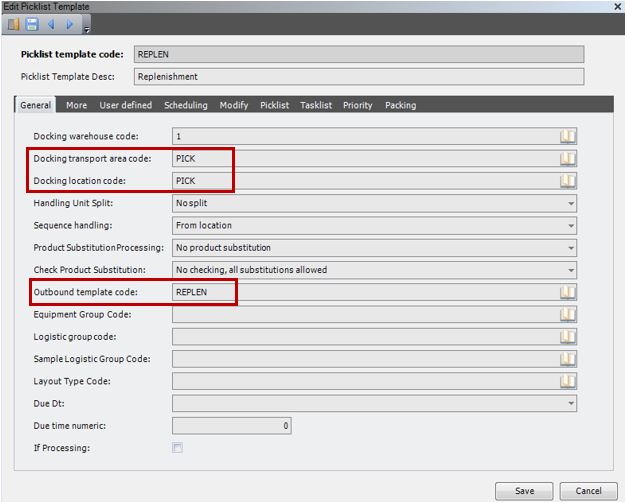
| Note | The destination docking transport area and dock location codes are not actual dock door values, as the destination location of a replenishment task is always a pick location. However, the entries must be valid transport area and location codes. |
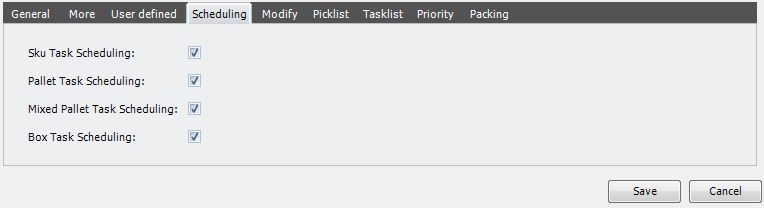
- Click the Scheduling tab.
- Refer to the image below for a typical example of how to configure automation for replenishment picks.
| Field | Description | Required |
| SKU Task Scheduling | When selected, indicates that task scheduling for piece picking may be done immediately. If immediate task scheduling is enabled, scheduling will depend on the time default and the transport procedure equipment. | No |
| Pallet Task Scheduling | When selected, indicates that task scheduling for full pallet picking may be done immediately. If immediate task scheduling is enabled, scheduling will depend on the time default and the transport procedure equipment. | No |
| Mixed Pallet Task Scheduling | When selected, indicates that task scheduling for mixed pallet picking may be done immediately. If immediate task scheduling is enabled, scheduling will depend on the time default and the transport procedure equipment. | No |
| Box Task Scheduling | When selected, indicates that task scheduling for box picking may be done immediately. If immediate task scheduling is enabled, scheduling will depend on the time default and the transport procedure equipment. | No |
- Click the Packing tab.
- Refer to the image below for a typical example of how to ensure that packing is not a task performed during a replenishment pick.

- Click Save.
Configure picking group and picking rules
A picking group is a group of sequenced picking rule sets that are linked to the replenishment order. The picking rules within the picking group are used to search for the inventory to satisfy a replenishment order.
Prerequisites
This procedure relates specifically to configuring a picking group and picking rules for replenishment, and it assumes that you are familiar with configuring picking groups and rules in general. To learn about setting up picking groups and picking rules, see About picking group and picking rules.
Procedure
- On the menu, expand Basic Data > Advanced Functions > Picking Group, and then double-click Picking Group.
- On the Picking Group window, in the toolbar, click . The Add Picking Group dialog box appears.
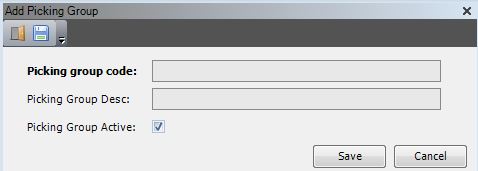
- Refer to the image below for an example of a typical picking group for replenishment, and then enter the information to create the picking group.

- Click Save.
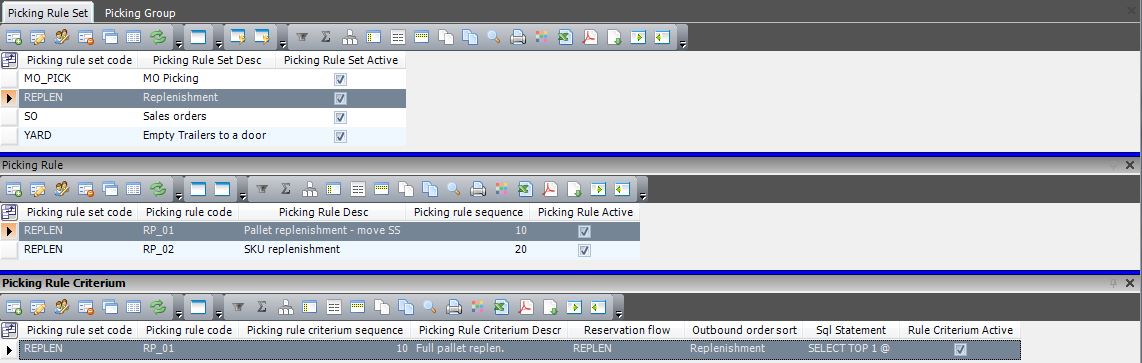
Configure the picking rule set
A picking rule set must be defined to hold a sequenced group of picking rules. After you create the picking rule set, you can add the picking rules for the replenishment picking group.
Procedure
- On the menu, expand Basic Data > Advanced Functions > Picking Group, and then double-click Picking Rule Sets.
- On the Picking Rule Sets window, in the toolbar, click . The Add Picking Rule Set dialog box appears.

- Refer to the image below for an example of a typical picking rule set for replenishment, and then enter the information to create the picking rule set.
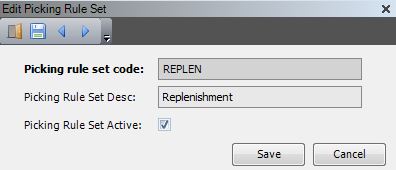
- Click Save.
Configure the picking rules
Picking rules determine how and where Iptor WM1 searches for inventory for replenishment orders. After you create a picking rule, you add the picking rule criteria, which identifies the order in which the rule will be applied within the picking group. Depending on your replenishment scenarios, you may need multiple picking rules. For example, you may need a rule for:
- Dynamic SKU replenishments.
- Fixed SKU replenishments.
- Pallet replenishments.
Prerequisites
Before you begin, determine the following.
- How many picking rules you need to add to the picking rule set to meet replenishment requirements.
- The order in which you want the rules to be applied.
Procedure
- On the menu, expand Basic Data > Advanced Functions > Picking Group, and then double-click Picking Rule Sets.
- On the Picking Rule Sets window, right-click the replenishment picking rule set to which you want to add a picking rule, and then click Picking Rule.
- In the Picking Rule grid view toolbar, click . The Add Picking Rule dialog box appears.
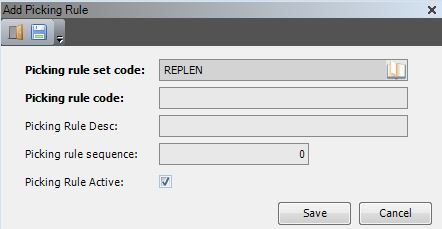
- Refer to the image below for an example of a typical picking rule for replenishment, and then enter the information to create the picking rule.
Note The picking rule configured in the image below will be the first rule within the rule set to be applied. Additional picking rules will have a higher picking rule sequence number. It is recommended that sequence numbers be at least 10 numbers apart. 
- Click Save.
Add picking rule criteria
The picking rule criteria determines the conditions under which a picking rule is applicable. You can add multiple criteria configurations to one picking rule.
Procedure
- On the menu, expand Basic Data > Advanced Functions > Picking Group, and then double-click Picking Rule Sets.
- On the Picking Rule Sets window, right-click the replenishment picking rule set to which the picking rule belongs, and then click Picking Rule.
- In the Picking Rule grid view, right-click the picking rule to which you want to add criteria, and then click Picking Rule Criterium.
- In the Picking Rule Criterium grid view toolbar, click . The Add Picking Rule Criterium dialog box appears.

- Refer to the image below for an example of a typical picking rule criteria configuration for replenishment, and then enter the information to add the criteria to the picking rule.
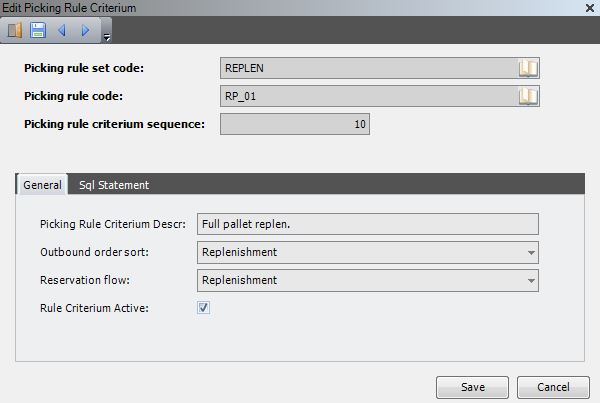
| Note | The SQL statement that supports the picking rule is generated as you enter the picking rule criteria on the General tab. You can click the Sql Statement tab to view the SQL statement; however, it is not necessary to write or edit the SQL code. The information is available for troubleshooting purposes, if necessary. |
- Click Save.
Example
The following image is an example of a completed picking rule set that is configured for replenishment.
Configure replenishment
Configure the replenishment template
The replenishment template is the mechanism in Iptor WM1 that determines how and when replenishment orders are created, and it relies on the prerequisite information configured earlier in this process. You can configure replenishments orders to be created in any of the following ways.
- Automatically, scheduled job-based
- Automatically, calendar-based
- Manually
Prerequisites
For time-based, on-demand replenishments, you must have defined the date list in the Calendars application.
Procedure
- On the menu, expand Basic Data > Advanced Functions > Replenishment, and then double-click Replenishment Template.
- On the Replenishment Template window, in the toolbar, click . The Add Replenishment Template dialog box appears.
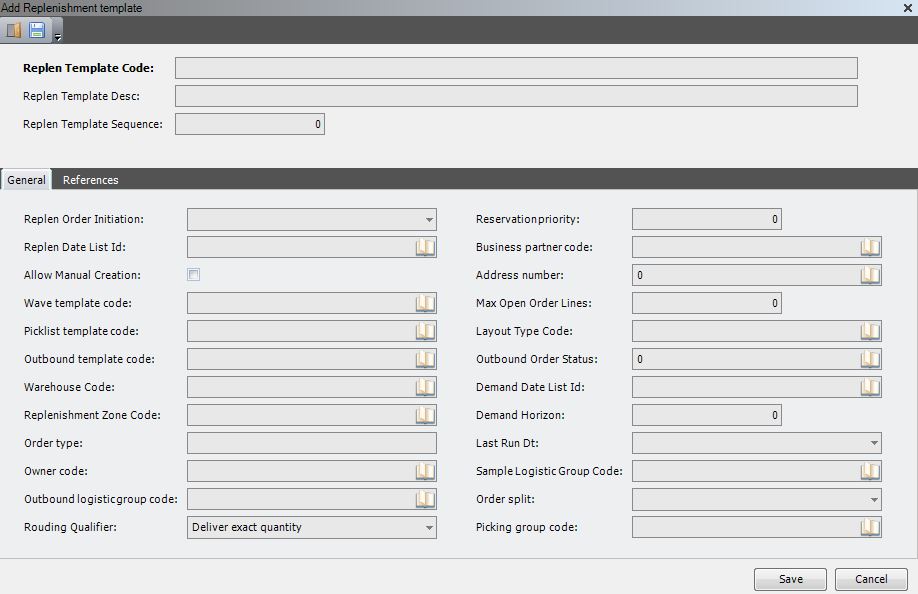
- Enter the following information.
| Field | Description | Required |
| Replenishment Template Code | Unique system code that Iptor WM1 will use when referencing the template during processing. | Yes |
| Replenishment Template Desc | Simple statement that describes the purpose of the template. | Yes |
| Replenishment Template Sequence | Number that the handling process (scheduled job) will refer to when determining the order in which to evaluate the replenishment template. It is suggested that you separate sequences by at least 10 numbers. For example, if the first replenishment template sequence is 10, the second template should have a sequence of at least 20. | Yes |
- On the General tab, enter the following information.
| Field | Description | Required | ||
| Replenishment Order Initiation | Value that indicates how and when replenishment orders associated this replenishment template will be initiated. The following values are supported:
|
Yes | ||
| Replenishment Date List ID | System code for the date list that indicates the day(s) of the week and time at which a replenishment job associated with this template will run.
|
No | ||
| Allow Manual Creation | When selected, indicates that replenishment orders based on this this template can be created manually. | No | ||
| Wave Template Code | System code for the wave template that will be used when a replenishment order based on this template is created. | No | ||
| Picklist Template Code | System code for the picklist template that will be used when a replenishment order based on this template is created. | No | ||
| Outbound Template Code | System code for the outbound template that will be used when a replenishment order based on this template is created. | No | ||
| Warehouse Code | Unique system code that identifies a warehouse. In this usage, it is the warehouse in which the replenishment tasks will be performed. This value is used when creating the replenishment order. | Yes | ||
| Replenishment Zone Code | System code for the replenishment zone in the warehouse to which this replenishment template applies. | Yes | ||
| Order Type | Value that indicates the picklist template code used when an outbound order is created for this replenishment template. | No | ||
| Owner Code | Unique system code that identifies an owner. In this usage, it is the owner of the inventory in the warehouse. This value is used when creating the replenishment order. | Yes | ||
| Outbound Logistic Group Code | Value that indicated the Logistic Group Code used for the Replenishment Template. | No | ||
| Rounding Qualifier | Value that describes how the requested quantity must be interpreted by the picking algorithm. The following values are supported.
|
No | ||
| Reservation Priority | Value that indicates the priority on the order created by the reservation template, which is then used to determine the sequence for the picking reservations. | No | ||
| Business Partner Code | Unique system code that identifies a business partner. In this usage, it is the business partner name that will be used when creating replenishment orders. | Yes | ||
| Address Number | System code for the business partner’s address. This value is used to create a replenishment order based on this replenishment template. | Yes | ||
| Maximum Open Order Lines | Upper limit to the number of order lines that may be open simultaneously for a replenishment template. This option is used for workflow management. For example, you may not want more than 100 order lines for replenishment open at one time. | No | ||
| Layout Type Code | Value that indicates the Layout Type of the Replenishment Template. | No | ||
| Outbound Order Status | Original status of a replenishment outbound order. | Yes | ||
| Demand Date List Id | System code for the date list that indicates the day(s) of the week and time at which a replenishment job associated with this template will run.
|
No | ||
| Demand Horizon | Time in minutes to look forward for replenishment by demand. The time to look forward is based on the demand date list. | No | ||
| Last Run Datetime | Display only. System-generated when a replenishment batch is created based on this replenishment template. | Yes | ||
| Sample Logistic Group Code | Value that indicates the logistic group code for sampling. | No | ||
| Order Split | Value that indicates whether the replenishment order creation process will create an order for all items selected by the template rule(s), or for each item individually. | Yes | ||
| Picking Group Code | Value that will overrule the value for the picking group normally taken when creating an outbound order line for the replenishment order. | No |
- Click the References tab.
- Enter the following information.
| Field | Description | Required |
| Order Reference | Default value that is used only to create the replenishment order creation. The value appears on the order, but does not have any other functional relevance. | No |
| Reference of Destination | Default value that is used only to create the replenishment order creation. The value appears on the order, but does not have any other functional relevance. | No |
| Reference of Project | Default value that is used only to create the replenishment order creation. The value appears on the order, but does not have any other functional relevance. | No |
| Reference of Origin | Default value that is used only to create the replenishment order creation. The value appears on the order, but does not have any other functional relevance | No |
- Click Save.
Configure the replenishment template rule
Procedure
- On the menu, expand Basic Data > Advanced Functions > Replenishment, and then double-click Replenishment Template.
- On the Replenishment Template window, right-click the replenishment template to which you want to add a rule, and then click Replenishment Template Rule.
- In the Replenishment Template Rule grid view toolbar, click . The Add Replenishment Template Rule dialog box appears.
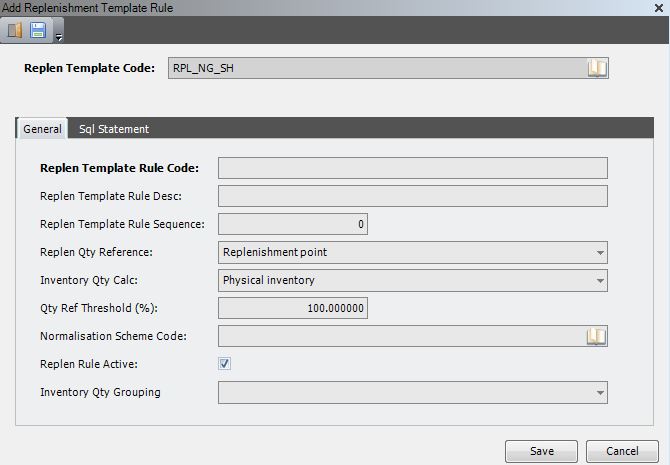
- Enter the following information.
| Field | Description | Required |
| Replenishment Template Code | Unique system code that Iptor WM1 will use when referencing the template during processing. This value that defaults to the replenishment template code associated with the replenishment template to which you are adding a rule. | Yes |
- On the General tab, enter the following information.
| Field | Description | Required | ||||||
| Replenishment Template Rule Code | Unique system code that Iptor WM1 will use when referring to the template rule during processing. | Yes | ||||||
| Replenishment Template Rule Description | Simple statement that describes the purpose of the rule. | No | ||||||
| Replenishment Template Rule Sequence | Number that identifies the order in which the rule will be evaluated when the replenishment job runs. | Yes | ||||||
| Replenishment Quantity Reference | Value that indicates the quantity of the product pick location that will be used as reference. The following values are supported.
|
Yes | ||||||
| Inventory Quantity Calculation | Value that defines how the actual quantity in the product pick location is calculated.
|
Yes | ||||||
| Inventory Quantity Grouping | Value that indicates how inventory quantity should be considered to decide if replenishment is needed.
|
No | ||||||
| Quantity Reference Threshold | Value that indicates the threshold percentage in order to be selected by the replenishment rule. The calculated inventory quantity must be below the reference quantity multiplied by this percentage. It can be used to divide replenishment into several priority classes. | Yes | ||||||
| Normalization Scheme Code | Value that indicates the normalization scheme for the replenishment template rule. | No | ||||||
| Replenishment Rule Active | When selected, indicates that the replenishment rule is usable. | Yes |
- Click Save.
Configure the replenishment rule condition
Procedure
- On the menu, expand Basic Data > Advanced Functions > Replenishment, and then double-click Replenishment Template.
- On the Replenishment Template window, right-click the replenishment template to which you want to add a condition to the rule, and then click Replenishment Template Rule.
- In the Replenishment Template Rule grid view, right-click the replenishment template rule to which you want to add a condition, and then click Replenishment Template Rule Condition.
- In the Replenishment Template Rule Condition grid view toolbar, click . The Add Replenishment Template Rule Condition dialog box appears.
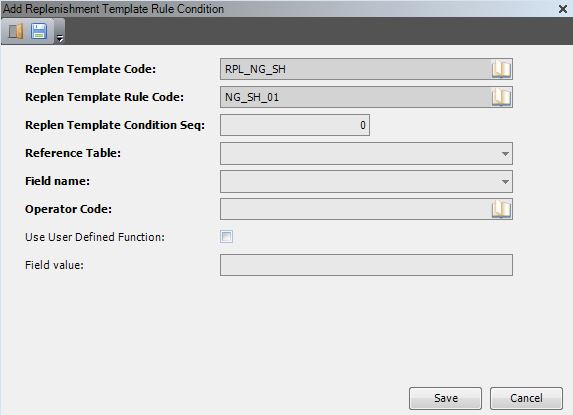
- Enter the following information.
| Field | Description | Required |
| Replenishment Template Code | Unique system code that Iptor WM1 will use when referencing the template during processing. In this usage, the value defaults to the selected replenishment template. | Yes |
| Replenishment Template Rule Code | Unique system code for the replenishment template rule. This value defaults to the selected replenishment template rule. | Yes |
| Replenishment Template Condition Sequence | Value that identifies the order in which this rule condition will be evaluated. | Yes |
| Reference Table | Identifier for the reference table. The table must be defined in sql_operator_table for rule_table replen_template_rule_condition. For example: OUTBOUND_ORDER_DETAIL | Yes |
| Field Name | Field from the selected reference table. For example: OUTBOUND_ORDER_SORT | Yes |
| Operator Code | Operator that indicates how to evaluate the field values. | Yes |
| Use User Defined Function | When selected, indicates that the Field Value contains a ’user defined function’ like an SQL function or a reference to a field in another table.
|
No |
| Field Value | Value that is used by the operator. You can enter a constant value like 0 or ABC or 2016-12-31 00:00:00.000. Do not put the entered value between quotes and put Use user defined function to 0. You can also enter a ’user defined function’ like an SQL function (for example, getdate()) or a reference to a field in another table (for example, item qty_per_container_expected), but then put Use user defined function to 1. |
Yes |
- Click Save.
Other Considerations
When configuring replenishments, you may want to consider these other configuration points.
- Container and container package type: For package calculation
- Task mode: If working on RF, task mode(s) must be created for task types: Replenishment Pallet (REPLE); Replenishment SKU (REPLU); Replenishment Mixed Pallet (REPLM); Replenishment Box (REPLB).
- Cap panels: Because standard CAP panels contain a lot of data, it is necessary to set up and format the panels to meet your needs.
- VAL: If logistic actions must be performed during replenishment, they must be set up and assigned to the replenishment template.
- Putaway rules: This is only required for dynamic pick locations. The logistic flow of the rule is then: Pick location determination.
- Printing: If pick labels or picklists must be printed, for each of the printouts, the layout has to be defined along with the necessary setup for the print trigger and device.
